Instagram Feed

Showing posts with label Basing. Show all posts

Tuesday, January 18, 2022

Finished with the bases


Three coats of paint on the bases.

Dark Brown layer - The Army Painter Warpaints Oak Brown

Light Brown - The Army Painter Warpaints Monster Brown

Dry Brush - Master Series Paint Bones Desert Sand 09432

Now I get to change my progress bars to 40%!!

Friday, August 26, 2016

Base, Prime, and Airbrush Ol' Rowdy

2 Days to go until I want to have Ol' Rowdy painted and ready for the tabletop.  I have this evening, tomorrow evening, and a couple of hours on Saturday.

Ol' Rowdy ready for priming.  I normally stick the mini on the base but I wanted a handle for airbrushing.  Then the handle needed extra support to stand up...

Here is the arm on a separate cork.

For the base, I did two pieces of cork, layered, then white glue along the edges and dipped in sand.
This is the primer I used.  It does a good job of a fine mist and the paint really sticks to it.  On a metal mini, it works great. I am not so sure about it on plastic minis as I had a horrible batch of Bones miniatures a while back and I don't remember which primer I used on them.

Base primed 
Both pieces primed 

Airbrushed P3 Thamar Black thinned with a 50/50 mix of distilled water and blue glass cleaner (Windex)

"Blue Tac" which in this case is white, used as a masking agent

I pushed the tac into the crevices  
Airbrush P3 cygnar blue base thinned with the 50/50 mix of water/glass cleaner

This is the cygnar blue highlight thinned and airbrushed on 
And without the tac 
Base blue and highlight blue airbrushed on.  I like the top of the oversized shoulder pad.  I need to look more into where to place the highlight on things like the forearm brace.

And without the tac

Currently = 45%

After Dry Brush, I will call it 50%

Thursday, August 4, 2016

A Little Work On Basing and Gluing


Trencher Commandos - Pushed Green Stuff into bases as filler, Re-Glued several bits

Superglued larger rocks to base, will sand next

Hung up paint shelves above work area

Thursday, February 23, 2012

Painting terrain

Stone gets over brush of Folk Art Medium Gray. The grassy parts get over brushed with FA Burnt Umber. Unfortunately, there are still a few white specks in the crater. I think next time I will soak the pieces in soapy water.

Tuesday, September 20, 2011

I Got New Minis!

 Recently, there was extra money in the family budget and I got to buy new minis!  I decided I wanted to buy the figs that would complete my trencher unit so I could paint them all in one go.  That means the Officer and Sniper along with three grenade porters.  It also means that a full kitted trencher unit has 15 minis.  That is a ton in Warmachine where often a unit is made of 6.
This is a shot of the other 10 trenchers ready for their buddies to join them in the painting cue.  You might also be able to pick out Eiryss, a unit of rangers, several casters, solos, and a random war wolf.

I also got to pick up 2 of the Stormsmith Storm Towers.  I really like the poses of these models.  I think they are great.  The only down side is that having two of them side by side shows how very similar they are.  I don't like repositioning arms and such but I might with these so they are a little varied.
This is the group based, following the steps I mentioned here.  It is tough not to get so excited you get the steps out of order!
On the Storm Towers, I used the cork for the interesting scenery bits.  Because of the cork and the space on the larger base, I glued the cork down first, then glued down the sand.  It just seems to blend the cork in better.
I did something a little different this time when I went back over the sand with my mix of glue/black paint/water.  I mixed it right in the glue bottle!  It was a little messy, as you can see from the top of the glue bottle, but overall, I liked the experience.  I did still have to spread it with a brush, as I perhaps didn't have enough room for water but it was fun.
I got the idea from scrolling through Mik's Minis, looking at his basing.  Three pics down is a picture of a plastic syringe he uses for the second layer of glue.  Check it out here. 

As you can see, the second coat doesn't have to cover like a base coat.  I just use it to make sure the sand is locked down and to get black into the crevices.  This will save me time when I am touching up after I spray the base coat.

Monday, September 19, 2011

Basing

There are a lot of great instructions out there for basing your minis.  Just a few links to get you going:

One of my flying bases
Santa Cruz

Just the Bases

Hand Cannon Online Part 1 and Part 2

Recently, I started painting again and it had been a while.  Okay, it had been about a year and a half.  It had been so long, that I got all of my basing steps out of order and it caused me extra work.  So I am writing myself a blog for the steps I like to follow.  Read along if you like =)

Step 1: Don't get too excited!  I know you just got that new ______ but follow the steps!  It will save you headaches later.

Step 2: Wash the mini in soap, water, and toothbrush.  I have never actually done this step but I want to start.  The last models came with a lot of mold release still on them.
Product Link

Step 3: Clean the mold lines, flashing, and vents.

Step 4: Crimp the slots to hold tight in the slota-bases.  Shave down the words on the slots if needed.

Step 5: Super Glue the mini into the slot and let it dry.  I really like the Loctite Superglue Gel.  It stays where I want it and has a tight, fast bond.

*If the base is large or the extra basing detail is large, reverse steps 6 & 7.  Note the Tharn Ravager below.  It actually worked better to glue the cork first but it was a pain painting the white glue around more pieces.

Step 6: Paint white glue onto the base.  Add a drop or two of water to get it to flow around the feet.  Dip the base with glue into the fine sand and knock off the extra.  While it is still moist, use your thumb to clean up the ring of the base.
Small Slate Chips from Santa Cruz

Step 7: Again, while it is still moist, move some of the sand out of the way and place a drop of Superglue Gel onto the base.  Place several small stones/cork/slate onto the base.  I do this step after the white glue because it makes it easier to paint the white glue on.

Step 8: Once dry, paint the base with a mix of [5 parts white glue / 5 parts black paint / 2-3 parts water].  The idea is to lock the sand down and let the black pigment sink into the crevices.  The black doesn't have to cover because in a moment we will spray paint it.  But first...

Step 9: Glue the metal washer onto the base.  I use Gorillla Glue for this application, as explained in another post.  If needed, shave down the extra metal from the slot with a Dremal sander so it doesn't 'rock' when on the washer.  I like adding the metal washer because I feel like it adds a little weight to the miniature and makes it less top heavy.  Do this after dipping it in the sand.  Otherwise, trapped sand will continually sneak out.  *Note: If you are going to magnetize the base to something like a movement try, the washer is out.
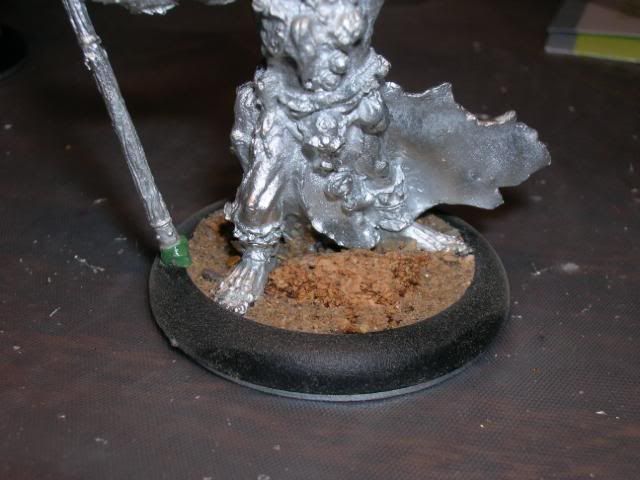
Cork with Sand
Step 10: Spray paint with flat black paint.  I prefer Krylon because it is the flattest I have found and it has good coverage.  It is best to have disposable gloves on (especially if you have to go to work later) but I have used a plastic bag as a glove before too.  Light layers and don't get it too thick.  Also, turn your spray can upside down at the end and spray until the gas comes out clear to clean the nozzle.

Step 11: Dry brush the base (and anything on the mini that needs dry brushing) first so your feet don't get dusty later.

Step 12: Don't get in a rush.  Wait to glue the static grass on after the clear coat.  Otherwise, static grass will find it's way into every nook and cranny of the mini.

This is my current process, broken down into the gory details.  What do you like?  What do you do differently?

Thursday, September 8, 2011

New Site to Check Out

I was searching for something or other and I stumbled across a new blog.  At Just the Bases: Custom Basing Ideas for Wargaming Minis, "Our goal is to become a repository of basing ideas for you to access as you put the finishing touches on(or are building) your miniature."  Check them out at http://justthebases.blogspot.com.  The bases are fantastic.  Here is an example:


Photobucket sucks...


From the blog site Just The Bases.  Picture at http://i127.photobucket.com/albums/p150/arithorn/1athundernemo.jpg. I think their bases & their painting looks fantastic!!!

Wednesday, September 7, 2011

Lots of Base-ing

Currently, I am basing.  I am gluing down sand, painting it with a mix of black paint and Elmer's glue, and drybrushing it with dark brown, light brown, and gray on the rocks. There are no pics because they just look black right now, but I am still painting and that is a good thing.  The batch?

  • 3 Bodgers
  • 10 Trenchers
  • 6 Rangers
  • eStryker
  • eCaine
  • eHaley
  • pNemo
  • pHaley
  • Kara Sloan
  • Squire 'Jack
  • Firefly
  •  
  • Piper of Ord
  • Eiryss, Mage Hunter
  •  
  • 6 Circle Druids
  • 1 Circle War Wolf
  •  
  • 1 DnD Character
More to come soon.

    Sunday, April 25, 2010

    My next project

    I have to wait a few days before I can afford the Long Gunners I want to buy so I dug these little guys out. They are the extra Bodgers that go with my Field Mechaniks. I like the poses but there are only two and honestly I am too lazy to fiddle with them. I will just have to paint them differently.

    I went ahead and cleaned the flashing, glued them to their bases, painted Elmer's glue down and added the sand from my Santa Cruz Basing Kit. Once this was dry, I glued the washers down, thus avoiding trapped sand.


    Next, I took them outside and primed them with Krylon Ultra-Flat Black paint. I know it's not the special snazzy stuff but it costs about 1/5th the amount so I am good with it =) I decided I wanted to base them in this order so the black primer would help seal in the sand and coat the washer. I had a difficult time getting the washer coated with brushed on paint. The spray paint coated much better.

    Posted by Picasa

    Monday, April 19, 2010

    Finishing the Gun Mages

    We have finally gotten moved in here in Austin and I am enjoying my new job with Best Buy. I also finally got my paints unpacked and I am almost finished with my Gun Mages. I busted out the basing kit I won from Santa Cruz Warhammer and got to it. Here is the mostly painted Gun Mages, Gun Mage Solo, and 3 Stormsmiths.


    Below is the chipped slate included in the kit. There is a nice selection of large and small pieces. The flat sides are great for gluing them to the base.


    Here I have glued down the pieces of slate. I am also getting ready to glue the washers underneath.


    Here is the sand included in the kit. The sand has good texture and, like the slate, there will be plenty for a ton of minis.


    A few of the bases already had washers, but I waited to glue down the rest until after the sand. This way, I avoid getting sand stuck under the base. I have roughed up the washers with my file for a better bond.


    After the sand is glued down, I mix Black paint and Elmer's 1:1 and paint the sand. It locks in the sand and provides a base coat.


    All lined up with a heavy overbrush of FA's Burnt Umber.


    A close up of the basing. Finished pics should be up tomorrow.


    Finally, I wanted to show off my herb garden. It is much smaller than my garden last year but it is much more manageable in an apartment space. Basil, Cilantro, Oregano, and Chives.

    Saturday, January 30, 2010

    Back from Vacation and Basing Kit


    I am back from vacation and we had a great trip. We drove through the Smokies, ate a lot of great food, and played Black Light Pirate Mini Golf (left).

    We also played Munchkin and dug out the old Magic: The Gathering cards. I haven't played Magic in years and we had a blast. I even got to teach my roommate Magic and we have played a few games since we got home. Good times!

    Before I left, I received the Basing Kit I won from Santa Cruz Warhammer. Its a nice kit and here are a few pics.

    From 01/30/10 Basing Kit
    The kit includes static grass, slate chips, sand, tooth picks, and a basing wash.

    From 01/30/10 Basing Kit
    This shows the size of the containers. This container of slate chips would probably base a whole army for me, if not more! Now I just have to get in gear and finish some minis =)

    Monday, August 31, 2009

    Basing at Broken Zealot

    I just wanted to point folks over to the Broken Zealot site. He just wrote a great tutorial for creating bases. Check it out!

    Friday, July 3, 2009

    Movement Tray

    I did this quickly while I was debating what to do with my Tharn Ravagers. I made the tray in this post. I based it with sand and sprayed it with Krylon's Ultra Flat Black Spray Paint sometime in the last few weeks. Today, I overbrushed it with FA's Burnt Umber, mimicking the basing I did on the Saurus Warriors I did in another post. I don't have any spray varnish so I will have to wait for the rest. 

    Label Cloud

    Mini's Past