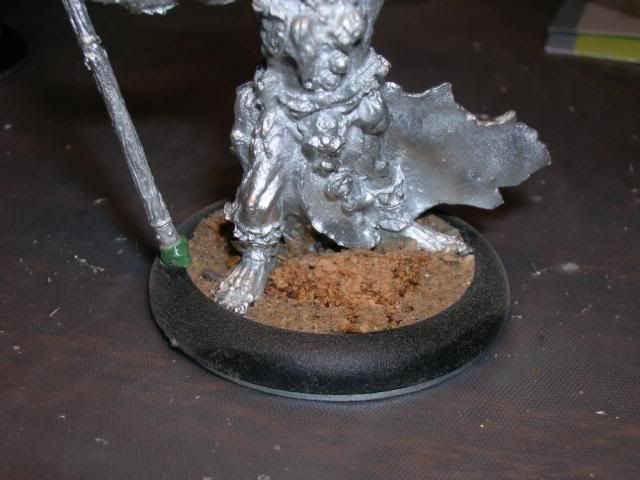
- Base coat black
- Overbrush base with FA Burnt Umber
- Drybrush model with FA Burnt Umber. Avoid the chain mail and the gun barrel as possible
- Drybrush base and model with FA Honeycomb
- Drybrush base with FA Teddy Bear as needed.
- Block in the gun barrel and chain mail (and grenades if present) with black
- Drybrush the gun barrel with a 2:1 mix of FA Metallic Gunmetal Grey and FA Metallic Sequin Black
- Use the same mix of FA Metallic Gunmetal Grey and FA Metallic Sequin Black to paint the bracers, gun stock band, and details.
- Drybrush the chain mail with FA Metallic Gunmetal Grey
- Paint the shovel and the smoke grenades with FA Medium gray. I am not entirely happy with this step, so feel free to find another level of shading on them.
- Block in the blue areas with FA Prussian Blue
- Dampen the shoulder pad with a wet brush, then highlight and blend with a mix of FA Cobalt Blue and FA Extender.
- Rank insignias were touched with a mix of FA Metallic Antique Gold and FA Metallic Sequin Black.
- Grenades were touched with FA Black Cherry, then tipped with FA Napthol Crimson
- Studs were tipped with FA Metallic Silver Sterling.
- The base was cleaned up with black around the ring.
Saturday, October 15, 2011
Painting Notes for Cygnar Trenchers
These are the paints I used in painting my Cygnar Trencher unit. I will eventually be painting a commando unit and I will want a similar effect. Feel free to read along. FA stands for Folk Art paints.
Saturday, October 8, 2011
Dnd and Restraint?
This week, at our weekly game, I tried to start a bar fight with my players. A troll named Brugg is the city enforcer. He came into the inn they were at, shook down the inn keep for protection money, and then started playing grab-butt with the often intimidating tiefling warlord. Wouldn't you know, of all the times to show restraint, this was it. Not when they talk to city officials, not when they talk to city watch, not even when they talk to the inn keep giving them free room and board. Nooooo, they show restraint with the enforcer troll who I am trying to use as an instigator. She flirted with him, played along, and wrapped her tiefling tail around him in an oh so ticklish way.. When he pushed things too far and wouldn't help with their questions, the players still kept things on the down-low. Brugg left the bar (after a quiet dagger was placed at his nads) confused, pissed, and promising retribution. Oh well, I will trade a bar fight for a recurring villain.
Thursday, October 6, 2011
Spouses and Warmachine
I finally got my wife to play Warmachine with me... and she won!
Her group was based on the battle box and consisted of:
I made the mistake of trying Caine's feat run while Stryker's +5 armor feat was in effect. Note to self: when Stryker pops his feat, hunker down, get in position, and camp focus. Stryker was able to break free from melee, throw Earthquake, and then shoot Caine while his face was in the dirt. She needed 10 dmg for the kill and she got 11.
Next time we play, I will take out the storm callers. She did not like how squishy they were and I killed them after they started disrupting my jacks. I will probably give her a basic melee unit, like sword knights, next time. Or I may just give her the Long Gunners, so we can continue to build on the current knowledge base. Anyway, I had a blast and with the ice cream Sunday for incentive, she didn't mind kicking my ass. Till next time =)
 |
| Caine, taking it laying down! |
 |
| The lay of the land. |
- Stryker
- Rienholdt
- Ironclad
- Charger
- Lancer
- 3 Stormsmith Storm Callers
- pCaine
- Defender
- Charger
- 6 Long Gunners
- Gun Mage Cpt. Adept
I made the mistake of trying Caine's feat run while Stryker's +5 armor feat was in effect. Note to self: when Stryker pops his feat, hunker down, get in position, and camp focus. Stryker was able to break free from melee, throw Earthquake, and then shoot Caine while his face was in the dirt. She needed 10 dmg for the kill and she got 11.
Next time we play, I will take out the storm callers. She did not like how squishy they were and I killed them after they started disrupting my jacks. I will probably give her a basic melee unit, like sword knights, next time. Or I may just give her the Long Gunners, so we can continue to build on the current knowledge base. Anyway, I had a blast and with the ice cream Sunday for incentive, she didn't mind kicking my ass. Till next time =)
Spouses and Warmachine
I finally got my wife to play Warmachine with me... and she won!
Her group was based on the battle box and consisted of:
I made the mistake of trying Caine's feat run while Stryker's +5 armor feat was in effect. Note to self: when Stryker pops his feat, hunker down, get in position, and camp focus. Stryker was able to break free from melee, throw Earthquake, and then shoot Caine while his face was in the dirt. She needed 10 dmg for the kill and she got 11.
Next time we play, I will take out the storm callers. She did not like how squishy they were and I killed them after they started disrupting my jacks. I will probably give her a basic melee unit, like sword knights, next time. Or I may just give her the Long Gunners, so we can continue to build on the current knowledge base. Anyway, I had a blast and with the ice cream Sunday for incentive, she didn't mind kicking my ass. Till next time =)
|
| Caine, taking it laying down! |
|
| The lay of the land. |
- Stryker
- Rienholdt
- Ironclad
- Charger
- Lancer
- 3 Stormsmith Storm Callers
- pCaine
- Defender
- Charger
- 6 Long Gunners
- Gun Mage Cpt. Adept
I made the mistake of trying Caine's feat run while Stryker's +5 armor feat was in effect. Note to self: when Stryker pops his feat, hunker down, get in position, and camp focus. Stryker was able to break free from melee, throw Earthquake, and then shoot Caine while his face was in the dirt. She needed 10 dmg for the kill and she got 11.
Next time we play, I will take out the storm callers. She did not like how squishy they were and I killed them after they started disrupting my jacks. I will probably give her a basic melee unit, like sword knights, next time. Or I may just give her the Long Gunners, so we can continue to build on the current knowledge base. Anyway, I had a blast and with the ice cream Sunday for incentive, she didn't mind kicking my ass. Till next time =)
Tuesday, October 4, 2011
DnD Recap
 | |
| The chamber right before the boss fight. Privateer minis pull double duty. |
Our recipe for the week was simple. We provided the salad and everyone brought their favorite toppings. We had everything including:
- Artichoke hearts
- Cheese
- Turkey
- Boiled eggs
- Pepperchino peppers
- 10 different dressings
- Black and green olives
- Croutons
- and more stuff I don't remember
Saturday, September 24, 2011
Progress
To the right of my blog, I have these great little progress bars. I love changing something from 80% to 90%. One of these days, several of these will tip over to the 100% mark. The ones at 93% are waiting for a not so humid day to get their final matte coat and some tufts of static grass. Oh well.
This week, I was able to
The mass needing paint include 1 leader, 9 grunts, 3 grenade porters, the officer and snipers. 15 minis... we will see where this goes.
This week, I was able to
- Clear Coat 3 gobber mechaniks,
- Clear Coat 10 long gunners
- Clear Coat 2 LG officers and 2 LG Standard bearers
- Clear Coat DnD tiefling
- Base and Prime 6 Trenchers
- Base and Prime 3 Trencher grenade porters
- Base and Prime Trencher Officer and Sniper
- Base and Prime Firefly light 'jack
- Base and Prime 2 Stormsmith Storm Towers
- Base and Prime 2 Journeyman Warcasters
The mass needing paint include 1 leader, 9 grunts, 3 grenade porters, the officer and snipers. 15 minis... we will see where this goes.
Tuesday, September 20, 2011
I Got New Minis!
Recently, there was extra money in the family budget and I got to buy new minis! I decided I wanted to buy the figs that would complete my trencher unit so I could paint them all in one go. That means the Officer and Sniper along with three grenade porters. It also means that a full kitted trencher unit has 15 minis. That is a ton in Warmachine where often a unit is made of 6.
 This is a shot of the other 10 trenchers ready for their buddies to join them in the painting cue. You might also be able to pick out Eiryss, a unit of rangers, several casters, solos, and a random war wolf.

I also got to pick up 2 of the Stormsmith Storm Towers. I really like the poses of these models. I think they are great. The only down side is that having two of them side by side shows how very similar they are. I don't like repositioning arms and such but I might with these so they are a little varied.
 This is the group based, following the steps I mentioned here. It is tough not to get so excited you get the steps out of order!
 On the Storm Towers, I used the cork for the interesting scenery bits. Because of the cork and the space on the larger base, I glued the cork down first, then glued down the sand. It just seems to blend the cork in better.
 I did something a little different this time when I went back over the sand with my mix of glue/black paint/water. I mixed it right in the glue bottle! It was a little messy, as you can see from the top of the glue bottle, but overall, I liked the experience. I did still have to spread it with a brush, as I perhaps didn't have enough room for water but it was fun.
 I got the idea from scrolling through Mik's Minis, looking at his basing. Three pics down is a picture of a plastic syringe he uses for the second layer of glue. Check it out here.
As you can see, the second coat doesn't have to cover like a base coat. I just use it to make sure the sand is locked down and to get black into the crevices. This will save me time when I am touching up after I spray the base coat.


I also got to pick up 2 of the Stormsmith Storm Towers. I really like the poses of these models. I think they are great. The only down side is that having two of them side by side shows how very similar they are. I don't like repositioning arms and such but I might with these so they are a little varied.
 This is the group based, following the steps I mentioned here. It is tough not to get so excited you get the steps out of order!
 On the Storm Towers, I used the cork for the interesting scenery bits. Because of the cork and the space on the larger base, I glued the cork down first, then glued down the sand. It just seems to blend the cork in better.
 I did something a little different this time when I went back over the sand with my mix of glue/black paint/water. I mixed it right in the glue bottle! It was a little messy, as you can see from the top of the glue bottle, but overall, I liked the experience. I did still have to spread it with a brush, as I perhaps didn't have enough room for water but it was fun.
As you can see, the second coat doesn't have to cover like a base coat. I just use it to make sure the sand is locked down and to get black into the crevices. This will save me time when I am touching up after I spray the base coat.
Monday, September 19, 2011
Basing
There are a lot of great instructions out there for basing your minis. Just a few links to get you going:
Santa Cruz
Just the Bases
Hand Cannon Online Part 1 and Part 2
Recently, I started painting again and it had been a while. Okay, it had been about a year and a half. It had been so long, that I got all of my basing steps out of order and it caused me extra work. So I am writing myself a blog for the steps I like to follow. Read along if you like =)
Step 1: Don't get too excited! I know you just got that new ______ but follow the steps! It will save you headaches later.
Step 2: Wash the mini in soap, water, and toothbrush. I have never actually done this step but I want to start. The last models came with a lot of mold release still on them.
Step 3: Clean the mold lines, flashing, and vents.
Step 4: Crimp the slots to hold tight in the slota-bases. Shave down the words on the slots if needed.
Step 5: Super Glue the mini into the slot and let it dry. I really like the Loctite Superglue Gel. It stays where I want it and has a tight, fast bond.
*If the base is large or the extra basing detail is large, reverse steps 6 & 7. Note the Tharn Ravager below. It actually worked better to glue the cork first but it was a pain painting the white glue around more pieces.
Step 6: Paint white glue onto the base. Add a drop or two of water to get it to flow around the feet. Dip the base with glue into the fine sand and knock off the extra. While it is still moist, use your thumb to clean up the ring of the base.
Step 7: Again, while it is still moist, move some of the sand out of the way and place a drop of Superglue Gel onto the base. Place several small stones/cork/slate onto the base. I do this step after the white glue because it makes it easier to paint the white glue on.
Step 8: Once dry, paint the base with a mix of [5 parts white glue / 5 parts black paint / 2-3 parts water]. The idea is to lock the sand down and let the black pigment sink into the crevices. The black doesn't have to cover because in a moment we will spray paint it. But first...
Step 9: Glue the metal washer onto the base. I use Gorillla Glue for this application, as explained in another post. If needed, shave down the extra metal from the slot with a Dremal sander so it doesn't 'rock' when on the washer. I like adding the metal washer because I feel like it adds a little weight to the miniature and makes it less top heavy. Do this after dipping it in the sand. Otherwise, trapped sand will continually sneak out. *Note: If you are going to magnetize the base to something like a movement try, the washer is out.
Step 10: Spray paint with flat black paint. I prefer Krylon because it is the flattest I have found and it has good coverage. It is best to have disposable gloves on (especially if you have to go to work later) but I have used a plastic bag as a glove before too. Light layers and don't get it too thick. Also, turn your spray can upside down at the end and spray until the gas comes out clear to clean the nozzle.
Step 11: Dry brush the base (and anything on the mini that needs dry brushing) first so your feet don't get dusty later.
Step 12: Don't get in a rush. Wait to glue the static grass on after the clear coat. Otherwise, static grass will find it's way into every nook and cranny of the mini.
This is my current process, broken down into the gory details. What do you like? What do you do differently?
 |
| One of my flying bases |
Just the Bases
Hand Cannon Online Part 1 and Part 2
Recently, I started painting again and it had been a while. Okay, it had been about a year and a half. It had been so long, that I got all of my basing steps out of order and it caused me extra work. So I am writing myself a blog for the steps I like to follow. Read along if you like =)
Step 1: Don't get too excited! I know you just got that new ______ but follow the steps! It will save you headaches later.
Step 2: Wash the mini in soap, water, and toothbrush. I have never actually done this step but I want to start. The last models came with a lot of mold release still on them.
 |
| Product Link |
Step 3: Clean the mold lines, flashing, and vents.
Step 4: Crimp the slots to hold tight in the slota-bases. Shave down the words on the slots if needed.
Step 5: Super Glue the mini into the slot and let it dry. I really like the Loctite Superglue Gel. It stays where I want it and has a tight, fast bond.
*If the base is large or the extra basing detail is large, reverse steps 6 & 7. Note the Tharn Ravager below. It actually worked better to glue the cork first but it was a pain painting the white glue around more pieces.
Step 6: Paint white glue onto the base. Add a drop or two of water to get it to flow around the feet. Dip the base with glue into the fine sand and knock off the extra. While it is still moist, use your thumb to clean up the ring of the base.
 |
| Small Slate Chips from Santa Cruz |
Step 7: Again, while it is still moist, move some of the sand out of the way and place a drop of Superglue Gel onto the base. Place several small stones/cork/slate onto the base. I do this step after the white glue because it makes it easier to paint the white glue on.
Step 8: Once dry, paint the base with a mix of [5 parts white glue / 5 parts black paint / 2-3 parts water]. The idea is to lock the sand down and let the black pigment sink into the crevices. The black doesn't have to cover because in a moment we will spray paint it. But first...
Step 9: Glue the metal washer onto the base. I use Gorillla Glue for this application, as explained in another post. If needed, shave down the extra metal from the slot with a Dremal sander so it doesn't 'rock' when on the washer. I like adding the metal washer because I feel like it adds a little weight to the miniature and makes it less top heavy. Do this after dipping it in the sand. Otherwise, trapped sand will continually sneak out. *Note: If you are going to magnetize the base to something like a movement try, the washer is out.
 |
| Cork with Sand |
Step 11: Dry brush the base (and anything on the mini that needs dry brushing) first so your feet don't get dusty later.
Step 12: Don't get in a rush. Wait to glue the static grass on after the clear coat. Otherwise, static grass will find it's way into every nook and cranny of the mini.
This is my current process, broken down into the gory details. What do you like? What do you do differently?
Saturday, September 17, 2011
Sims: Be Warned

I have liked the Sims games for a long, long time. It started off with a love affair for Sim City. I was head over heals for Sim City 2000. I toyed around with Sim Theme Park, though I quickly strayed to Roller Coaster Tycoon. The Sims were where I lost all control. I began playing Sims 2 one afternoon and three days later, I got up to stretch my legs! (this is only a slight exaggeration). Thankfully, my computer was too old and couldn't play Sims 3. Today, I found Sims on Facebook. It doesn't matter how old your computer is. They will take you anyway they can get you. And they got me good. I lost 5 hours today! Be warned. It is a great little game, much better than the farming and mafia stuff. And now I'm late for work...
Friday, September 16, 2011
Shopping and Girl Fights
 Post Game for DnD Night:
The Food: Hearty Queso
Ingredients-
- 1 Can Black Beans
- 1 Can Corn
- 1 pound ground beef
- 1 jar of queso
- 1 bag of corn tortilla chips
- Cook the ground beef and season with salt, pepper, garlic, and onion. Think taco meat.
- Drain the black beans and corn.
- Drain the meat when it is cooked through.
- Pour the beans and corn in the same pan as the beef and mix on a medium temp.
- Turn the temp to low and add the queso. Stir. If you let it sit, the cheese will burn to the bottom of the pan.
- Serve with corn chips.
- This also works well in a slow cooker at parties!
Thursday night is our DnD 4E game. We have been playing for a couple of months now and the newbies are hacking their way through hobgoblins and undead like pros. Well, at least like competent amateurs. Last week, they ran head long into a patrol of hobgoblins that were able to roll 18-20's on most of their attack rolls. The fighter, was knocked into his second death saving throw (3 strikes and your out). This week, the fighter and the cleric were both absent, leaving the party with just the female players.

They decided to leave the dungeon, sell some loot, and buy healing potions and some AoE alchemist fire. Girls after my own heart. When they made it back to Winterhaven, they found that the dead in the graveyard had risen and the town needed them to fight off their dead relatives. Once in the graveyard, they ran into the female elf who had given them bad information and nearly caused their demise.
The alchemist fire bombs quickly dispatched the decrepit skeletons while concentrated attacks took out the Elven B****. They found a note on her, giving them more reason than ever to return to the keep and stop the evil plans at work. They also learned the name of the one trying to open the portal: Kalarel.
Monday, September 12, 2011
Sick Time = Painting Time
I stayed home from work today with a head cold. I have been able to paint some and this is what I got done. These three bodgers will round out my Field Mechaniks unit. I love these little models. They are some of my favorites in the Cygnar line. The only complaint is that there are only two poses. Oh well.


Saturday, September 10, 2011
The Cygnar Army as it Stands
The blue stuff is done. The grey stuff is assembled and primed. The clear stuff has a long way to go. For those new to WarmaHordes, US is the unit strength or the number of minis in a unit. FA is the number of those units you can have on the field. US 6-10, FA 2 would mean you could have a maximum of 20 of those models on the field in a single warcaster army.


Thursday, September 8, 2011
New Site to Check Out
I was searching for something or other and I stumbled across a new blog. At Just the Bases: Custom Basing Ideas for Wargaming Minis, "Our goal is to become a repository of basing ideas for you to access as you put the finishing touches on(or are building) your miniature." Check them out at http://justthebases.blogspot.com. The bases are fantastic. Here is an example:
From the blog site Just The Bases. Picture at http://i127.photobucket.com/albums/p150/arithorn/1athundernemo.jpg. I think their bases & their painting looks fantastic!!! |
Wednesday, September 7, 2011
Lots of Base-ing
Currently, I am basing. I am gluing down sand, painting it with a mix of black paint and Elmer's glue, and drybrushing it with dark brown, light brown, and gray on the rocks. There are no pics because they just look black right now, but I am still painting and that is a good thing. The batch?
- 3 Bodgers
- 10 Trenchers
- 6 Rangers
- eStryker
- eCaine
- eHaley
- pNemo
- pHaley
- Kara Sloan
- Squire 'Jack
- Firefly
- Piper of Ord
- Eiryss, Mage Hunter
- 6 Circle Druids
- 1 Circle War Wolf
- 1 DnD Character
Tuesday, September 6, 2011
I Wants It....
So I work at the American electronics store Best Buy. There are a few perks. One of them is putting your name on the cardboard shippers that come out. Mine is all over the back of the Space Marine game shipper. I also tried for the Star Wars in the background but that was labeled way before I could get my hands on it. Oh well... soon the Space marine will be on my wall =)

While I was at work today doing... product research (yeah, that's what we will call it), I came across a game that releases 10/25/11. It is called Disney Universe.
It looks like a fun cross between Little Big Planet, Disney's Extreme Skate Adventure, with a smidge of Kingdom Hearts. It is being carried on PS3, Xbox and Wii. The screen shots looks like the scenery might not get 5 stars but I like the idea of collecting the suits and cooperative game play of 1-4 players. Also, if you pre-order the game through Best Buy, you get the download codes for Peter Pan, Daisy Duck, and Absalom. It also looks like Game Stop is giving you the download code for Captain Hook, Daisy Duck, and Absalom. (Neither store is supporting the downloads on the Wii.) At $49.99 USD, this is definitely going on my wish list!
Saturday, September 3, 2011
Dnd Night
I look forward to DnD night all week. I get to have my friends over, we eat great food, and we roll some dice.
The group I am DMing for consists of 4 newbies and 1 with a year of experience. I really like teaching the game to new people. The always seem to come up with new ideas I don't expect.
This week, one of the guys made Asian BBQ Chicken, Grilled Corn on the Cob, and a wonderful Ice Cream Topping with Peaches, pecans, brown sugar and butter simmered on the stove. It was fantastic!!!
The picture to the right is the first level of the Keep on the Shadowfell, a great adventure to take your PC's from 1-3 levels. The maps are well made and the story is fairly straight forward. The PC's have gone through the preliminary story and now they must fight their way down to the second level and seal the rift before Orcus is able to come through.
They have acquired 2 pet goblins and lots of experience. I love Thursday Game Nights =)
Friday, September 2, 2011
Gorilla Glue
 I like gluing washers to the bases of my mini's. It makes them just a little weightier and a little less likely to tip over. The best stuff I have found for this is Gorilla Glue. When it dries, it forms a tough bond. The best part is that the glue is somewhat rubbery. This means that dropped minis don't lose their bases. This stuff can take a bounce. I have been using the standard stuff that dries a light brownish yellow. I just bought the stuff that dries white and I will let you know how that turns out.
Two things about Gorilla Glue.
1. It works best when under pressure. What that means is you have to be able to clamp it and leave it.
2. It foams as it activates and dries. This produces a good bond, even on uneven surfaces but it leaves some strange results. It is easy to trim off of a base or file down. I have had problems using it in tight detail places as you can't quiet get your files and knives down into them to clear out the small stuff.

I don't recommend it on arms other places where it might foam onto your details but for big flat surfaces, it is the toughest stuff I have found.
Thursday, September 1, 2011
The Tiefling
 She makes her debut tonight on our DnD table. She had a couple of weapon swaps, a good bit of purple ink from the old GW series, and a couple of cleavage lines. All she needs is her base finished and a clear coat. Not bad for having not painted anything in a year.
Wednesday, August 31, 2011
Space Marine Demo
I came across the Space Marine Demo in the Playstation Store 2 days ago and downloaded it. I was impressed. If you are looking for it on your system, check out the info page here. I have to say I was impressed. I do not normally enjoy this style of game but there was something incredibly satisfying about smashing Orks and Gretchin while blasting about with a jump pack. Others will write better reviews but I recommend checking out the free demos. And I am asking Santa for a jump pack.
Tuesday, August 30, 2011
I Hate Epic Caine
Epic Caine and Epic Stryker might be great if you like to super-pose your miniatures. I prefer for the pieces to fit. Do you see that right leg? Even in the stock photo, it is a little askew and the foot does not lay flush with the base. Below is what the mini looks like with the arms glued on. When trying to position that leg, Caine ends up with a club foot, bow legged, knock-kneed, or a combination there of. Grrr...


I finally just super glued it and hoped for the best. I am fairly certain I should have pinned it but I just did not want to screw around with it anymore. Caine is the one on the lower right. Next to him is a one armed Epic Stryker. He is almost as bad. There are also 2 last rangers, Classic Haley, and a DnD fig getting their bases. The only one finding this process relaxing is the bear in the hot tub.


I finally just super glued it and hoped for the best. I am fairly certain I should have pinned it but I just did not want to screw around with it anymore. Caine is the one on the lower right. Next to him is a one armed Epic Stryker. He is almost as bad. There are also 2 last rangers, Classic Haley, and a DnD fig getting their bases. The only one finding this process relaxing is the bear in the hot tub.

Monday, August 29, 2011
The Next Battle Engine
While letting the glue dry, I noticed a close resemblance to Cygnar's Storm Strider...
 |
| Cygnar's next battle engine! What do you think? |
 |
| Here is the Firefly with fully magnetized arms. |
Setting Goals

- Cygnar Firefly glued and magnetized.
- Cygnar Rangers glued and primed.
- Cygnar Trenchers glued and primed.
- Circle of Orborus Druids glued and primed.
- Gnome character for DnD pinned and glued.
- Tiefling character for DnD glued and primed
- Cygnar caster Classic Haley glued.
- Continuing to glue the stupid eStriker and eCain Cygnar casters.
- Prime the Cygnar Firefly and Haley.
- Paint the DnD Tiefling
Sunday, August 28, 2011
Note to Self

Saturday, August 27, 2011
New Hobby Area
I like pictures of hobby areas. So here is a picture of mine. It is still a work in progress up at least I can dig my mini's out again.
A quick tour will reveal spray paint and Simple Green sitting on a box of Lizardmen still not unpacked. A Space marine Dreadnought guards the bits box. More Space Marines hang on the wall while several Orks are trying to take over the unpainted ranks of Cygnar. Many of my gaming books are within easy reach with the Order of the Stick looking on. Fun Times!
 |
| Click on the pic to go even further down the rabbit hole... |
Friday, August 26, 2011
Cygnar Firefly
 |
| Click on the pics for larger versions. |
I spent the first couple of hours digging out mini's and organizing my area. It is still small but I think it will work. I dug out all my Cygnar mini's that still need paint and lined them up. Then I got intimidated and nearly packed them all back up. I decided that what I really wanted to paint was a warjack and then I realized that I have them all painted! So I went to the game store and purchased a Firefly.


I really liked how 95% of the pieces fit together. The legs and back furnace didn't even have to be glued, though I did. The arms each fit together really well and could have been glued without any pinning. If you have built the metal warjacks before, you can understand my joy. Of course, I couldn't just glue it. I wanted to be able to swap arms. Sometimes, you just need an extra Lancer, or you can pull an arm off when it experiences combat damage. And I wanted to play with my magnets!


 I started by tracing one of the magnets with a mechanical pencil. I then used my Dremel tools to hollow it out. It took a while to get used to how the tip of the Dremel removed material but it really was the best tool for the job. Once I got the circle the right size, I was able to remove more material deeper without changing the size of the circle. I was aiming to get the magnet flush with the plastic.
I am very glad I started with drilling out the body. It is much easier than the arms. The arm sockets happen to be about a hair bigger than the 0.250" diameter (6.4mm) and 0.063" thick (1.6mm) rare earth magnets that I have on hand. I basically removed everything out to the studs and as deep as I could without busting through. I could literally see daylight through the bottom of the piece when I was done drilling!
Note for others: You can do it the same way I did. It obviously works. But, you could save yourself some grief and either get smaller magnets or or just cut off the arm piece with the studs and glue straight on the hydraulics. A smaller magnet would work because the pieces are plastic and they are holding virtually no weight. Cutting off the studded collar would work, though you lose detail and there is less material to glue to.
The rest is still a work in progress. More pics will be coming soon.


Thursday, July 28, 2011
What DnD Character are you?
I Am A: Lawful Good Human /Cleric (3rd/2nd Level)
 Ability Scores:
Strength-11
Dexterity-13
Constitution-14
Intelligence-16
Wisdom-15
Charisma-13
Alignment:
Lawful Good A lawful good character acts as a good person is expected or required to act. He combines a commitment to oppose evil with the discipline to fight relentlessly. He tells the truth, keeps his word, helps those in need, and speaks out against injustice. A lawful good character hates to see the guilty go unpunished. Lawful good is the best alignment you can be because it combines honor and compassion. However, lawful good can be a dangerous alignment because it restricts freedom and criminalizes self-interest.
Race:
Humans are the most adaptable of the common races. Short generations and a penchant for migration and conquest have made them physically diverse as well. Humans are often unorthodox in their dress, sporting unusual hairstyles, fanciful clothes, tattoos, and the like.
Primary Class:
Monks are versatile warriors skilled at fighting without weapons or armor. Good-aligned monks serve as protectors of the people, while evil monks make ideal spies and assassins. Though they don't cast spells, monks channel a subtle energy, called ki. This energy allows them to perform amazing feats, such as healing themselves, catching arrows in flight, and dodging blows with lightning speed. Their mundane and ki-based abilities grow with experience, granting them more power over themselves and their environment. Monks suffer unique penalties to their abilities if they wear armor, as doing so violates their rigid oath. A monk wearing armor loses their Wisdom and level based armor class bonuses, their movement speed, and their additional unarmed attacks per round.
Secondary Class:
Clerics act as intermediaries between the earthly and the divine (or infernal) worlds. A good cleric helps those in need, while an evil cleric seeks to spread his patron's vision of evil across the world. All clerics can heal wounds and bring people back from the brink of death, and powerful clerics can even raise the dead. Likewise, all clerics have authority over undead creatures, and they can turn away or even destroy these creatures. Clerics are trained in the use of simple weapons, and can use all forms of armor and shields without penalty, since armor does not interfere with the casting of divine spells. In addition to his normal complement of spells, every cleric chooses to focus on two of his deity's domains. These domains grants the cleric special powers, and give him access to spells that he might otherwise never learn. A cleric's Wisdom score should be high, since this determines the maximum spell level that he can cast.
Find out What Kind of Dungeons and Dragons Character Would You Be?, courtesy of Easydamus (e-mail)
Ability Scores:Strength-11
Dexterity-13
Constitution-14
Intelligence-16
Wisdom-15
Charisma-13
Alignment:
Lawful Good A lawful good character acts as a good person is expected or required to act. He combines a commitment to oppose evil with the discipline to fight relentlessly. He tells the truth, keeps his word, helps those in need, and speaks out against injustice. A lawful good character hates to see the guilty go unpunished. Lawful good is the best alignment you can be because it combines honor and compassion. However, lawful good can be a dangerous alignment because it restricts freedom and criminalizes self-interest.
Race:
Humans are the most adaptable of the common races. Short generations and a penchant for migration and conquest have made them physically diverse as well. Humans are often unorthodox in their dress, sporting unusual hairstyles, fanciful clothes, tattoos, and the like.
Primary Class:
Monks are versatile warriors skilled at fighting without weapons or armor. Good-aligned monks serve as protectors of the people, while evil monks make ideal spies and assassins. Though they don't cast spells, monks channel a subtle energy, called ki. This energy allows them to perform amazing feats, such as healing themselves, catching arrows in flight, and dodging blows with lightning speed. Their mundane and ki-based abilities grow with experience, granting them more power over themselves and their environment. Monks suffer unique penalties to their abilities if they wear armor, as doing so violates their rigid oath. A monk wearing armor loses their Wisdom and level based armor class bonuses, their movement speed, and their additional unarmed attacks per round.
Secondary Class:
Clerics act as intermediaries between the earthly and the divine (or infernal) worlds. A good cleric helps those in need, while an evil cleric seeks to spread his patron's vision of evil across the world. All clerics can heal wounds and bring people back from the brink of death, and powerful clerics can even raise the dead. Likewise, all clerics have authority over undead creatures, and they can turn away or even destroy these creatures. Clerics are trained in the use of simple weapons, and can use all forms of armor and shields without penalty, since armor does not interfere with the casting of divine spells. In addition to his normal complement of spells, every cleric chooses to focus on two of his deity's domains. These domains grants the cleric special powers, and give him access to spells that he might otherwise never learn. A cleric's Wisdom score should be high, since this determines the maximum spell level that he can cast.
Find out What Kind of Dungeons and Dragons Character Would You Be?, courtesy of Easydamus (e-mail)
Sunday, June 26, 2011
What's New
 |
| Two little pepper plants and the hope of lettuce. |
- Received a promotion at work
- Had a house built
- Moved into said house
- Gotten married!
- Planted a new summer garden
- Turned 33
- Been asked to GM a DnD group with 4 brand new players. The link for the new group is DnD 101 at Obsidian Portal
- Been asked to write a leadership curriculum for small groups
- and Painted 0 miniatures. I can't even dig my way to my desk right now!
Tuesday, February 22, 2011
Small Update
Just a short update. No mini's are getting painted right now but we are moving forward on the house stuff. They have put up the form boards on the lot and have moved in more dirt. Today, they dug trenches in the dirt they moved in and put in the plumbing. We visit our dirt most days and it is very exciting. I have high hopes that we will have a concrete slab by Friday.
 | |
| Wednesday, 2-16-11 |
 |
| Thursday 2-17-11 |
 |
| Friday 2-18-11 |
 |
| Monday 2-21-11 |
 |
| Tuesday 2-22-11 |
Tuesday, January 11, 2011
Distractions Part II

- We are buying a house! In fact, we are building a house. To the right is the floor plan that we chose. Bedroom 2 will probably be my hobby room and possibly a gaming table! We are very excited about the large living area. There are no walls dividing the Living Room, Dining Room, and the Kitchen so visually, it is a huge room. We choose options for the house in the next two weeks and they could start construction in early February.
- We decided to move out of our apartment after a) It took an hour and half to respond to the "emergency" pager as our apartment flooded with gray water from upstairs and b) my car was broken into on Christmas and the apartment made zero effort to assist. Grrr...
- I have spent $0 on miniatures or really anything else. Our current mantra: "I don't want ____, I want to buy a house." I haven't even bought the new Force book for Circle of Orborus which I was sure I would.
- World of Warcraft Cataclysm released and I have leveled up my little gnome mage from 73 to 81 in about 3 weeks. Not bad since it normally takes me about a month a level as a casual player. I am enjoying to new content and the new Worgen race.
- I am still in my painting slump. I imagine sometime in the summer, after we move into the new place, I will be looking for a new distraction.
- I am planning on being in the new house by late spring / early summer. I hope to be able to plant my new vegetable garden at the new place!
Subscribe to:
Posts (Atom)
