Shelexie, do you have your Tharn completed? This is the day you said you would have them done by... (I automated this post when I set my painting deadlines).
Edit: I finished them ahead of schedule! They are painted, varnished, and have static grass!
Showing posts with label Tharn Ravagers. Show all posts
Showing posts with label Tharn Ravagers. Show all posts
Sunday, August 30, 2009


Thursday, August 27, 2009
Tharn Ravagers Finally Finished!
Okay, so it only took me several months but they are done! In fact, these are the first miniatures I have ever taken from start to finish (meaning based and varnished). I can still see places that I wish I had fixed but it is nice to have them done and sealed where I can't go back to them again! Here are the pics (click for a bigger view).


There is also one more red head shown in the group shot but not here.
Tharn Ravagers were 97% ---> now 100% complete!
While I had the varnish and static grass out, I also finished up the movement tray (click here for how I made it) for the Saurus Warriors. The Saurus still need varnish. I may get these done before I start my Cygnar Warmachines for my September deadline.
Wednesday, August 26, 2009
Varnish
Question: Does anyone know what happens if you spray varnish (gloss or matt) onto static grass? Does it work fine or make things weird? Please comment before I decide to spray my Saurus Warriors!
2 months ago, I wrote into The Painting Corps asking about varnish. Lots of people sent in their tips and tricks. Yesterday, I painted Winsor & Newton's Gloss Varnish (that I found on sale!) onto the areas that I thought would get the most wear. I hit the axe blades, the bracers, and the cloaks near the base. I wasn't shy about it but I didn't leave puddles either. I did notice that if a puddle formed and my brush dipped into it again, it picked up a hint of the paint. I was more careful there after and had no problem with it.
I waited about 4 hours to let the varnish completely set, then sprayed the models with 2 coats of Krylon's Acrylic Crystal Clear Gloss. I wanted to give it a full 24 hours between the painted on and the spray but I was excited. I was able to wait over night before I sprayed on 2 coats of Krylon's Acrylic Crystal Clear Flat coat. All I have left is a little static grass and these will be done!
Tharn Ravagers were 95% ---> now 97% complete!
2 months ago, I wrote into The Painting Corps asking about varnish. Lots of people sent in their tips and tricks. Yesterday, I painted Winsor & Newton's Gloss Varnish (that I found on sale!) onto the areas that I thought would get the most wear. I hit the axe blades, the bracers, and the cloaks near the base. I wasn't shy about it but I didn't leave puddles either. I did notice that if a puddle formed and my brush dipped into it again, it picked up a hint of the paint. I was more careful there after and had no problem with it.
I waited about 4 hours to let the varnish completely set, then sprayed the models with 2 coats of Krylon's Acrylic Crystal Clear Gloss. I wanted to give it a full 24 hours between the painted on and the spray but I was excited. I was able to wait over night before I sprayed on 2 coats of Krylon's Acrylic Crystal Clear Flat coat. All I have left is a little static grass and these will be done!
Tharn Ravagers were 95% ---> now 97% complete!
Tuesday, August 25, 2009
Tharn Ravagers, Steaks, and Sales!
Tharn Ravagers:
I have the details finished as good as they are going to get. I think there is still a feather I hadn't painted in these pics but other than that, the painting is done! These are well on their way to being completed by my Aug. 30th deadline. I just have to varnish and flock them.
Tharn Ravagers were 83% ---> now 95% complete!
(click on the pic for a larger view)


 Steaks:
I wanted to throw this in. A while back, I read Andy's post over on Little Lead Heroes about salting steaks. I was skeptical but checked out the Cooking Page link he referenced. It talks about coating your steak with a layer of sea salt, then letting sit for a while (time table based on thickness of steak provided at the end of the cooking page). I had a skirt steak (cheap and thin) so I decided to give it a shot. If I messed it up, I was only out $2.
I wish I had an after shot but we ate it too quickly! It really did work and the steak tasted great. It was still a little chewy, but it was a skirt steak. However, it was much better than it would have been with out the salt treatment. Follow the directions on the two links above and try it for yourself. I also really enjoyed making garlic and basil butter, as per the directions near the bottom of the cooking page. The basil was fresh from my garden!

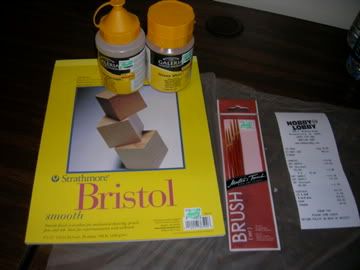
Sales! I went to Hobby Lobby yesterday and they are having a good sale on stuff I wanted.

 Steaks:
I wanted to throw this in. A while back, I read Andy's post over on Little Lead Heroes about salting steaks. I was skeptical but checked out the Cooking Page link he referenced. It talks about coating your steak with a layer of sea salt, then letting sit for a while (time table based on thickness of steak provided at the end of the cooking page). I had a skirt steak (cheap and thin) so I decided to give it a shot. If I messed it up, I was only out $2.
I wish I had an after shot but we ate it too quickly! It really did work and the steak tasted great. It was still a little chewy, but it was a skirt steak. However, it was much better than it would have been with out the salt treatment. Follow the directions on the two links above and try it for yourself. I also really enjoyed making garlic and basil butter, as per the directions near the bottom of the cooking page. The basil was fresh from my garden!
Sales! I went to Hobby Lobby yesterday and they are having a good sale on stuff I wanted.
- All Brushes = 50% off
- All Art Paper = 30% off
- Winsor & Newton Gloss Varnish and Matt Varnish bottles found on a clearance rack normally $9.49 each = $5.69 each! That's 40%.
Thursday, August 20, 2009
The Job & More Cygnar Mini's
Job - For those of you who are following, I just wanted to announce that I was hired today! Yes, I am proud to be a Best Buy employee. Now the trick will be not spending my whole pay check there...
Tharn - are on schedule to be finished by the 30th. I feel good about the details and now have to finish painting the bases before I take the plunge and seal them.
More eye candy - A couple more models I already have painted.
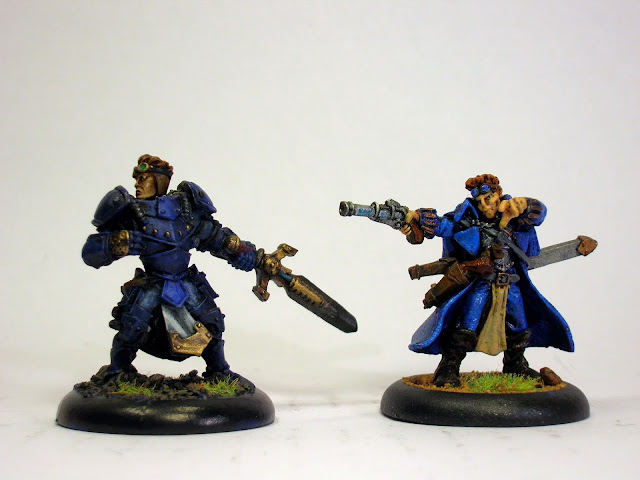
Journeyman Warcaster & Gun Mage Captain Adept
Journeyman Warcaster & Gun Mage Captain Adept
2 Chargers
Saturday, August 8, 2009
Tharn Ravager Details
I started working on my Tharn again. Their last post is here. When I can't quite figure out the next color, they often get left alone for a while. I recently read on GWpertinent's site that this is why you should have several units going at once. That way, if you get stuck on one unit, you can paint another one for a while. I like his advice (and his site!) and I'm considering which other unit to start again.
Several notes:


- Sorry these aren't the best pics but thankfully I was focused on the painting rather than the photography.
- Just a reminder, I use the Folk Arts (FA) paints on my models unless otherwise noted.
- I did a wash of Burnt Umber over the bracers, which you couldn't really see once it dried.
- Next, a wash of Honeycomb over the bracers which lightened it but ultimately I wasn't happy with.
- I did like the GW Dark Green Ink (I don't think you can get this anymore) over the axe, letting it run into the runes.
- I dry brushed FA's Metallic Gunmetal Gray over the green on the axes. It darkened and mostly covered the green, leaving a slight green hue and the runes. I really like FA's metallic line and recommend y'all check them out. They have a high density of metallic particles and come in a variety of colors.
- Then, I edged the "sharp" part of the blade with FA's Metallic Silver Sterling. I am really pleased with this effect.
- The hair looks crazy here and even crazier in person. I used FA's Alizarin Crimson, one of their Artist Pigment line. The artist pigment line has a higher concentration of pigment in the paint. It has to be thinned some but offers great coverage. Normally, this color looks like deep brick red but somehow on him it looked punk!
- Thankfully, drybrushing FA's Pure Orange brought the hair back where I wanted it!
- Here, I have lined the bracers with a thin coat of Honeycomb. I also lined the straps and axe bindings and painted the head coverings (not shown on this model) with the thined Honeycomb.
- I did a light wash of GW's Chestnut Ink on the bracers and I think I can finally live with them.
Thursday, July 23, 2009
Catching up
First of all, thanks to Mik for the nice words and welcome to the new followers! I spent a week in West Texas and the high ever day was over 100! When I got back, I wasn't real happy with the way my Tharn Ravagers were going (you can check out their progress by clicking on the Tharn label to the right). I love the models but I had gotten a little carried away with the highlights on the flesh. I am only looking for table top quality but I wasn't happy. As a result, I let them sit for about a week. I just wasn't quite sure how to fix them. After Mik posted about my site, I knew I was ready to tackle them again.
I went over the flesh with a wash of the old GW Brown ink. It toned down the highlights and I can live with them now. Then I moved to the leather bits and bracers. They are based with a mix of Folk Arts Burnt Umber and Black, about 3 or 4:1. They are still in progress, but I feel like I am over the hump somehow.
Tharn Ravagers = 63%


I have a fat, pissy cat named Callie (think Garfield). I tell people she bites and they say, "Oh animals love me." 5 minutes later, they are complaining that she bit them!? Anyway, I like her. We get along just fine. Last night, my room mate bought new work shoes. I have no idea how Callie was able to fit her big ___ in here but I took a picture of it.

My garden:
While I was in Texas, it went crazy. My room mate watered it and we have harvested about 6 zucchini so far. I grilled them up and they have gone in omelets, pasta salads, and stew.
Just for fun:
I have a fat, pissy cat named Callie (think Garfield). I tell people she bites and they say, "Oh animals love me." 5 minutes later, they are complaining that she bit them!? Anyway, I like her. We get along just fine. Last night, my room mate bought new work shoes. I have no idea how Callie was able to fit her big ___ in here but I took a picture of it.
She got back at me later for taking her picture by jumping up on my painting table. Luckily, she didn't step in the paint (this time).
Thursday, July 2, 2009
Tharn Ravagers Skin Tones
In a previous post, I worked out the colors I wanted to use for the brown fur/skin. The base is FA's Burnt Umber. The mid-tone is a mix of Burnt Umber to Tapioca 1:1. The highlight is Burnt Umber to Tapioca 1:2. Then I lined in the extreme overhead highlight with the same mix. My lining is a little sloppy but I feel like it reduced the overall dusty look.
Drybrushing is a little bit of a crutch but I had decided that these were going to be table top quality and that freed me up to use it. 7 models with two layers of highlights and lining done in 1 hour. Not bad for table top. Now I gotta figure out the details.
Tharn Ravagers = 60% 
Monday, June 29, 2009
Tharn Ravager Cloaks
An update on the Tharn Ravagers: I black washed the bases and the axe heads. The wash got into all the crevices but it was not very dark. A coat of black paint darkened up the base.
The greens weren't quite dark enough in the recesses so I mixed some old GW Dark Green Ink with water 1:1 and washed the green cloaks with it. I dry brushed the cloaks with Folk Arts Aspen green, then a lighter dry brush of Aspen Green and Tapioca 1:1. Then I lined in that same highlight mix on the edges of the cloak. I'm not sure it makes a big difference but I liked doing it. Aside from the bits of bone and the things on the belts, I think I am calling the cloaks done. That feels nice!
Tharn Ravagers = 55% 
Wednesday, June 17, 2009
Tharn Ravager Colors
I decided to quickly block in my colors. 

Body, leather, and haft - Block in with Folk Arts (FA) Burnt Umber #462.
Green cloak - Block in with 1:1 mix of FA's Aspen Green #646 and FA's Hauser Green Dark # 461.
I started to do the green with just the Aspen green but over the gray primer, it was too light. If I had used my normal black primer, it probably would have been just fine.
Next, I want to block in the bone colors and the black on the base. I plan on drybrushing the base some so I can't leave it too long.
Tuesday, June 16, 2009
Basing Tharn Ravagers
I finally got the last pieces glued onto the Tharn Ravagers. I really like the way these guys look.

I usually base last but I ran into problems with that before. I decided to try basing before priming this time. I tore off pieces of cork and super glued it down. Some of the cork I cut in half, as it was too tall.

I used a little watered down glue to add sand and I like the effect. The cork seems to blend in well.

Here is the unit with cork and sand.

I moved outside and used Valspar's gray primer (not paint) that I picked up at a home improvement store. This is going to look a little funny until we mow.
I usually base last but I ran into problems with that before. I decided to try basing before priming this time. I tore off pieces of cork and super glued it down. Some of the cork I cut in half, as it was too tall.

I used a little watered down glue to add sand and I like the effect. The cork seems to blend in well.
Here is the unit with cork and sand.
I moved outside and used Valspar's gray primer (not paint) that I picked up at a home improvement store. This is going to look a little funny until we mow.
The coat went on well and provides plenty of tooth for the first layer. Up next: blocking in colors. I had to refer back to my original color blog to remember the mix I wanted to use.
Tuesday, June 2, 2009
Building Tharn Ravagers
I worked on my Tharn Ravagers all morning long yesturday. I am still trying to get them all assembled. There are several problems: they are all metal miniatures, they each have 4-6 tiny pieces, and I have to pin several of the pieces. Two hours later and what do I have to show for it? A few more arms, heads, and a torso. Ahh! I have 2 heads and a arm/axe combo, then I am done!
Sorry for the complaining. Normally, I enjoy building and pinning minis but I am ready to have these guys done!
Pictures are clickable but the minis are still a WIP. I will be on a mini vacation for the next few days so I guess they will have to get done when I return.


Sorry for the complaining. Normally, I enjoy building and pinning minis but I am ready to have these guys done!
Pictures are clickable but the minis are still a WIP. I will be on a mini vacation for the next few days so I guess they will have to get done when I return.


Saturday, May 30, 2009
Getting Started Again

This is the cleanest my work area has been in a long time.

I got it set up again with my Tharn Ravagers ready to go.
I started assembling the last model to make the full unit. I hope to get them completely assembled in the next few days.
Sunday, May 17, 2009
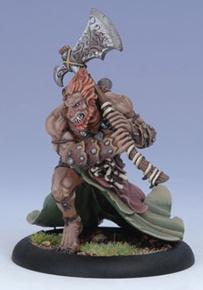 I finally got my last Tharn Ravager. The box set comes with the leader and 3 troops. 2 more troops can be added, along with the shaman unit attachment. The game store took forever to get it in this last individual guy but it's here now.
I have already assembled the others and pictures are here. After finals week and graduation, I will build this one, then start painting the unit of 7. I'm excited!
Friday, April 24, 2009
Basing
I have never been good at basing. At first, I didn't know where to start, so I left it to the end. I have also never been good at deciding a model was done so I never was good at spraying them with varnish. Of all my many models, none have varnish. Therefore, none have bases either, because I was leaving that until the end. So now, I am basing, regardless if it is done. In fact, when I do my Tharn Ravagers, I think I will put the basing material down before I prime it!
So I decided to paint the bases I did last night with FA's Burnt Umber, a really dark brown. I think I did a cross between over brushing and bad painting. I wanted to leave the black in the crevasses, so I dipped my flat blade bush in the paint, ran it across the rim of the paint tray, then drug it across the surface. If the paint covered all the black or just hit the high points, I just let it do what it was going to do. It looks ok now, even if it is a little dark for the Jungles of Lusteria. I did this assembly line for 5 Terradon bases, 16 Saurus, 2 Skink Priests, and a Cold One.


So I decided to paint the bases I did last night with FA's Burnt Umber, a really dark brown. I think I did a cross between over brushing and bad painting. I wanted to leave the black in the crevasses, so I dipped my flat blade bush in the paint, ran it across the rim of the paint tray, then drug it across the surface. If the paint covered all the black or just hit the high points, I just let it do what it was going to do. It looks ok now, even if it is a little dark for the Jungles of Lusteria. I did this assembly line for 5 Terradon bases, 16 Saurus, 2 Skink Priests, and a Cold One.


Friday, April 17, 2009
Paint Testing for the Tharn Ravagers
I wasn't sure how I wanted to paint these guys. I really like the pictures from Privateer Press.

They are brown but the tones are more gray than anything else. I had no idea how to get that color and I don't purchase the P3 paints (Privateers line of paints). They seem to be great paints but they are pricey. I have used Folk Art Paints (you can get them at any hobby store and perhaps even Wal-Mart) and I like them, especially their artist pigments. They have gold caps rather than white and the pigment is more highly concentrated.
So I pulled out every brown that I had, which wasn't many, and did a test page. Load your brush up and drag it across the page. This shows the range of colors you can get from one paint. Important to remember - label the paints on the test page. I thought I would remember which was which but as I got interested in mixing the colors, I quickly forgot how I got to each color.

The first stripe is Folk Art's (FA) Burnt Umber #462. The second is FA Raw Sienna #452 and the third is FA Teddy Bear Tan #419. In person, the second tinges to the orange side and the third was just too light. The fourth stripe is mislabeled but (I think) it is the Teddy Bear Tan with a drop of Games Workshop Brown Ink. See what I mean about labeling your stuff right away? Apparently, GW is no longer make the ink so it may be what they are now calling washes.
I finally settled on the first stripe and just adding FA Tapioca #903. It is not a pure white, so you avoid some of the chalkiness in the final color. The mid-tone highlight will be 1:1 Burnt Umber to Tapioca. The top highlight will be about 1:2 or 1:3. I can also darken the Burnt Umber if I need to with Black or the GW Brown Ink.
I am still saving up money to buy the last three modes I need so no painting yet.

They are brown but the tones are more gray than anything else. I had no idea how to get that color and I don't purchase the P3 paints (Privateers line of paints). They seem to be great paints but they are pricey. I have used Folk Art Paints (you can get them at any hobby store and perhaps even Wal-Mart) and I like them, especially their artist pigments. They have gold caps rather than white and the pigment is more highly concentrated.
So I pulled out every brown that I had, which wasn't many, and did a test page. Load your brush up and drag it across the page. This shows the range of colors you can get from one paint. Important to remember - label the paints on the test page. I thought I would remember which was which but as I got interested in mixing the colors, I quickly forgot how I got to each color.

The first stripe is Folk Art's (FA) Burnt Umber #462. The second is FA Raw Sienna #452 and the third is FA Teddy Bear Tan #419. In person, the second tinges to the orange side and the third was just too light. The fourth stripe is mislabeled but (I think) it is the Teddy Bear Tan with a drop of Games Workshop Brown Ink. See what I mean about labeling your stuff right away? Apparently, GW is no longer make the ink so it may be what they are now calling washes.
I finally settled on the first stripe and just adding FA Tapioca #903. It is not a pure white, so you avoid some of the chalkiness in the final color. The mid-tone highlight will be 1:1 Burnt Umber to Tapioca. The top highlight will be about 1:2 or 1:3. I can also darken the Burnt Umber if I need to with Black or the GW Brown Ink.
I am still saving up money to buy the last three modes I need so no painting yet.
Thursday, April 16, 2009
Tharn Ravagers
My friend Coffey came over a the first of the month and he just happened to have his miniatures in the car with him. I haven't really messed with my miniatures for about 2 years and he wanted me to start playing again. I resisted but his models looked great. Over the next few days, I dug out my stuff, just to find what I still had un-built / un-painted. The next thing I knew, I was pulling out tools and models and super glue. I found my Tharn Ravagers, models I really wanted to build and paint. Here they are in the beginning. (The images are click-able to make them larger).

The first step was collecting the pieces into the specific miniatures. I followed the box very closely, for the simple reason that I liked the poses. If I add more later, I will probably vary the poses some. However, I will be more familiar with the models then and more comfortable changing them.

After lots of pinning, super glue, and green stuff, they look like this:

The above picture still uses some white wall tack to hold the models together just for the pictures. Basically, I wanted a picture and still wasn't ready to glue everything yet. About half-way through this process, I found a great site on building the Ravagers. It takes you through step-by-step how to get them together. Check it out, about 2/3rds of the way down the page at Brushthralls.com.
Here is a close up of one of the Ravagers.

At this point, I realized that the box set of Tharn Ravagers contains 4 miniatures while you are actually allowed to field a unit of 6 plus the Shaman. I really want to paint a full unit at one time so they look the same (for better or worse) so these are on a little bit of a hold while I scrounge up the money for 3 more models.

The first step was collecting the pieces into the specific miniatures. I followed the box very closely, for the simple reason that I liked the poses. If I add more later, I will probably vary the poses some. However, I will be more familiar with the models then and more comfortable changing them.

After lots of pinning, super glue, and green stuff, they look like this:

The above picture still uses some white wall tack to hold the models together just for the pictures. Basically, I wanted a picture and still wasn't ready to glue everything yet. About half-way through this process, I found a great site on building the Ravagers. It takes you through step-by-step how to get them together. Check it out, about 2/3rds of the way down the page at Brushthralls.com.
Here is a close up of one of the Ravagers.

At this point, I realized that the box set of Tharn Ravagers contains 4 miniatures while you are actually allowed to field a unit of 6 plus the Shaman. I really want to paint a full unit at one time so they look the same (for better or worse) so these are on a little bit of a hold while I scrounge up the money for 3 more models.
Subscribe to:
Posts (Atom)