Monday, August 31, 2009
Basing at Broken Zealot
I just wanted to point folks over to the Broken Zealot site. He just wrote a great tutorial for creating bases. Check it out!
Sunday, August 30, 2009
Scheduled August 30th Post
Shelexie, do you have your Tharn completed? This is the day you said you would have them done by... (I automated this post when I set my painting deadlines).
Edit: I finished them ahead of schedule! They are painted, varnished, and have static grass!
Edit: I finished them ahead of schedule! They are painted, varnished, and have static grass!
Friday, August 28, 2009
1000+ views
Hey guys! My counter hit 1,000 today! I have posted 79 blogs since I began in April and I never thought I would get this many hits. Thank you! Keep reading, painting, gaming, and having fun!
Thursday, August 27, 2009
Tharn Ravagers Finally Finished!
Okay, so it only took me several months but they are done! In fact, these are the first miniatures I have ever taken from start to finish (meaning based and varnished). I can still see places that I wish I had fixed but it is nice to have them done and sealed where I can't go back to them again! Here are the pics (click for a bigger view).


There is also one more red head shown in the group shot but not here.
Tharn Ravagers were 97% ---> now 100% complete!
While I had the varnish and static grass out, I also finished up the movement tray (click here for how I made it) for the Saurus Warriors. The Saurus still need varnish. I may get these done before I start my Cygnar Warmachines for my September deadline.
Wednesday, August 26, 2009
Varnish
Question: Does anyone know what happens if you spray varnish (gloss or matt) onto static grass? Does it work fine or make things weird? Please comment before I decide to spray my Saurus Warriors!
2 months ago, I wrote into The Painting Corps asking about varnish. Lots of people sent in their tips and tricks. Yesterday, I painted Winsor & Newton's Gloss Varnish (that I found on sale!) onto the areas that I thought would get the most wear. I hit the axe blades, the bracers, and the cloaks near the base. I wasn't shy about it but I didn't leave puddles either. I did notice that if a puddle formed and my brush dipped into it again, it picked up a hint of the paint. I was more careful there after and had no problem with it.
I waited about 4 hours to let the varnish completely set, then sprayed the models with 2 coats of Krylon's Acrylic Crystal Clear Gloss. I wanted to give it a full 24 hours between the painted on and the spray but I was excited. I was able to wait over night before I sprayed on 2 coats of Krylon's Acrylic Crystal Clear Flat coat. All I have left is a little static grass and these will be done!
Tharn Ravagers were 95% ---> now 97% complete!
Tuesday, August 25, 2009
Tharn Ravagers, Steaks, and Sales!
Tharn Ravagers:
I have the details finished as good as they are going to get. I think there is still a feather I hadn't painted in these pics but other than that, the painting is done! These are well on their way to being completed by my Aug. 30th deadline. I just have to varnish and flock them.
Tharn Ravagers were 83% ---> now 95% complete!
(click on the pic for a larger view)


 Steaks:
I wanted to throw this in. A while back, I read Andy's post over on Little Lead Heroes about salting steaks. I was skeptical but checked out the Cooking Page link he referenced. It talks about coating your steak with a layer of sea salt, then letting sit for a while (time table based on thickness of steak provided at the end of the cooking page). I had a skirt steak (cheap and thin) so I decided to give it a shot. If I messed it up, I was only out $2.
I wish I had an after shot but we ate it too quickly! It really did work and the steak tasted great. It was still a little chewy, but it was a skirt steak. However, it was much better than it would have been with out the salt treatment. Follow the directions on the two links above and try it for yourself. I also really enjoyed making garlic and basil butter, as per the directions near the bottom of the cooking page. The basil was fresh from my garden!
Steaks:
I wanted to throw this in. A while back, I read Andy's post over on Little Lead Heroes about salting steaks. I was skeptical but checked out the Cooking Page link he referenced. It talks about coating your steak with a layer of sea salt, then letting sit for a while (time table based on thickness of steak provided at the end of the cooking page). I had a skirt steak (cheap and thin) so I decided to give it a shot. If I messed it up, I was only out $2.
I wish I had an after shot but we ate it too quickly! It really did work and the steak tasted great. It was still a little chewy, but it was a skirt steak. However, it was much better than it would have been with out the salt treatment. Follow the directions on the two links above and try it for yourself. I also really enjoyed making garlic and basil butter, as per the directions near the bottom of the cooking page. The basil was fresh from my garden!

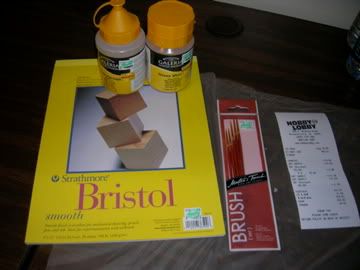
Sales! I went to Hobby Lobby yesterday and they are having a good sale on stuff I wanted.

 Steaks:
I wanted to throw this in. A while back, I read Andy's post over on Little Lead Heroes about salting steaks. I was skeptical but checked out the Cooking Page link he referenced. It talks about coating your steak with a layer of sea salt, then letting sit for a while (time table based on thickness of steak provided at the end of the cooking page). I had a skirt steak (cheap and thin) so I decided to give it a shot. If I messed it up, I was only out $2.
I wish I had an after shot but we ate it too quickly! It really did work and the steak tasted great. It was still a little chewy, but it was a skirt steak. However, it was much better than it would have been with out the salt treatment. Follow the directions on the two links above and try it for yourself. I also really enjoyed making garlic and basil butter, as per the directions near the bottom of the cooking page. The basil was fresh from my garden!
Steaks:
I wanted to throw this in. A while back, I read Andy's post over on Little Lead Heroes about salting steaks. I was skeptical but checked out the Cooking Page link he referenced. It talks about coating your steak with a layer of sea salt, then letting sit for a while (time table based on thickness of steak provided at the end of the cooking page). I had a skirt steak (cheap and thin) so I decided to give it a shot. If I messed it up, I was only out $2.
I wish I had an after shot but we ate it too quickly! It really did work and the steak tasted great. It was still a little chewy, but it was a skirt steak. However, it was much better than it would have been with out the salt treatment. Follow the directions on the two links above and try it for yourself. I also really enjoyed making garlic and basil butter, as per the directions near the bottom of the cooking page. The basil was fresh from my garden!
Sales! I went to Hobby Lobby yesterday and they are having a good sale on stuff I wanted.
- All Brushes = 50% off
- All Art Paper = 30% off
- Winsor & Newton Gloss Varnish and Matt Varnish bottles found on a clearance rack normally $9.49 each = $5.69 each! That's 40%.
Monday, August 24, 2009
Saurus Painting Guide
This is a continuation of the write up on White Dwarf's painting workshop for Lizardmen, May 2003, Issue #280. This is what I followed to paint my Lizardmen army and I like the results. Again, I just found the sheet in my files and wanted to commit it to the website before I lost it again. This is an adaptation of their article from page 28. I didn't keep as good a notes on the colors actually used so I will highlight the GW color's recommended and take my best guess about the paint I used. Please adjust this when painting. When I was certain, I mentioned the FA (Folk Art) brand first and highlighted it. This would be much more difficult to replicate since I took less accurate notes =(

Prep:

Weapons:

Glue on the Shields.
Check them over for details and paint the edges of the bases black again.
Varnish the mini's and the movement tray with matt varnish.
Eyes, tongue, and mouth can be painted with gloss varnish for a more realistic wet look.
Glue on Static grass on the mini's and movement tray.
March them off to war!

Prep:
- Assemble the model minus the shield. Consider pinning the arms but most of the Saurus arms have stayed. If I do these with the spears, I think I would definitely want to pin them.
- I ranked them up before I put the heads on to make sure they fit together and then glued the heads of the left guard facing outward. I might like to do the same on the right side next time.
- These worked out just fine to be painted on their bases.
- Now is also the time to glue sand, cork, or any pebbles you want on the base.
- This is also a good time to make the movement tray for them and coat it with sand.
- I also think it would help to magnetize the mini's now so they can be more easily handled.
- Spray black primer on the mini's and the movement tray. Touch up with watered down FA's Pure Black.
- Now paint the whole model (except perhaps the weapons but this can be touched up later) with GW's Enchanted Blue thinned with a little water (FA's Colbalt Blue or Brilliant Ultramarine?).
- Now is probably a good time to over brush the base and movement tray with FA's Burnt Umber.
- Then drybrush with FA's Teddy Bear Tan. Set the movement tray aside now until it is time to varnish and static grass.
- Drybrush the skin with a mix of GW's Enchanted Blue and Ice Blue, 1:1. (Ice Blue may be FA's Light Blue or Baby Blue).
- Wash the entire model in GW's Blue Ink mixed with a generous amount of water for more even coverage.
- The ink darkened the model so now drybrush just the skin with the mix of GW's Enchanted Blue and Ice Blue, 1:1.
- Highlight the skin with GW's Ice Blue.
- Paint with GW's Regal Blue (I am pretty sure this was FA's Prussian Blue).
- Then drybrush with GW's Enchanted Blue. Keep the drybrushing under control and on the scales only.
- Basecoat the back spines with 2 coats of GW's Red Gore = FA's Alizarin Crimson.
- Stipple the red splotches on the head plate with GW's Red Gore = FA's Alizarin Crimson.
- Highlight the spines and splotches with GW's Blood Red = FA's Napthol Crimson.
- I seem to have given the higher up guys more splotches, perhaps suggesting more age.

Weapons:
- Spears are given a basecoat of FA's Pure Black, then FA's Burnt Umber.
- Highlight with a mix of GW's Scorched Brown and Snakebite Leather, 1:1. I probably used FA's Honeycomb or Teddy Bear Tan, possibly Raw Sienna.
- Highlight with GW's Snakebite Leather.
- Hand weapons are given a basecoat of FA's Pure Black, then drybrushed with FA's Medium Gray.
- Spray black primer
- Dry Brush FA's Black Cherry (GW's Scab Red) and FA's Alizarin Crimson (GW's Red Gore) pretty heavy.
- Paint the top half of each scale with FA's Napthol Crimson (GW's Blood Red).
- Add a highlight line around the top of each scale with FA's Pure Orange (GW's Blazing Orange).
- (The following 3 steps mimic the jewelry section and can be done at the same time).
- (If you have done the shields' scales, this part can be applied to their details too.)
- Basecoat the jewelry with FA's Pure Black.
- All metallic bits were painted with FA's Metallic Antique Gold., and highlighted with FA's Metallic Pure Gold.
- Use FA's Metallic Gunmetal Gray for the blade of the spear (GW's Boltgun Metal).
- Highlight the blade of the spear with FA's Metallic Silver Sterling., (GW's Mithril Silver)
- Teeth on the hand weapon, teeth on the shields, and darts on the blowpipe were picked out with FA's Teddy Bear Tan, then highlighted with FA's Tapioca. Leave some of the Teddy Bear Tan to give the teeth an aged look.
- Pick out the claws with FA's Tapioca. Any of the Tapioca can be highlighted with a little more white added it needed.
- The mouth and tongue were painted with FA's Alizarin Crimson, similar to GW's Red Gore.
- Highlight the tongue with FA's Skintone.
- Pick out the teeth with FA's Tapioca.
- The eyes were painted with FA's Napthol Crimson, then a small dot of black was made in each pupil with a very fine tip sharpie marker. Okay, so it's cheating a little but those things are incredible small!

Glue on the Shields.
Check them over for details and paint the edges of the bases black again.
Varnish the mini's and the movement tray with matt varnish.
Eyes, tongue, and mouth can be painted with gloss varnish for a more realistic wet look.
Glue on Static grass on the mini's and movement tray.
March them off to war!
Sunday, August 23, 2009
Skink Painting Guide
Originally, White Dwarf published a painting workshop for Lizardmen, May 2003, Issue #280. I just found the sheet in my files and wanted to commit it to the website before I lost it again. Please feel free to skip to the pic at the end =) This is an adaptation of their article from page 20. (That issue also has a great article on building a game table!)

Prep:
- Assemble the model minus the shield. Consider pinning the arms but know they are going to fall off. If I do these again, I will try to position most of the arms "tucked in" so that the blowpipe arm is less likely to pop off.
- I might also consider doing these off the bases so I can do more with the bases but there are so many, it is simply faster put them on the base. Also, their legs are far enough apart to drybrush easily.
- Now is also the time to glue sand, cork, or any pebbles you want on the base.
- This is also a good time to make the movement tray for them and coat it with sand.
- I also think it would help to magnetize the mini's now so they can be more easily handled.
- Spray Black or black primer on the mini's and the movement tray. Touch up with watered down FA's Pure Black.
- Now paint the whole model (except perhaps the weapons but this can be touched up later) with FA's Thunder Blue thinned with a little water.
- Now is probably a good time to over brush the base and movement tray with FA's Burnt Umber.
- Then drybrush with FA's Teddy Bear Tan. Set the movement tray aside now until it is time to varnish and static grass.
- Wash the skin with FA's Azure Blue and water 1:1.
- Drybrush the skin with FA's Baby Blue. The article said GW's Shadow Gray and GW's Space Wolves Gray but I went with just Baby Blue.
- Paint the inside of the head fin with FA's Light Blue.
- The crest is lined with FA's Metallic Emerald Green.
- Paint with FA's Thunder Blue.
- Then paint with FA's Metallic Emerald Green.
- Hand weapons and blowpipes are given a basecoat of FA's Pure Black.
- Then drybrushed with FA's Medium Gray (GW's Codex Gray).
- Spray black primer
- Dry Brush FA's Hauser Green Dark pretty heavy but try to leave the black in between the scales.
- Paint the top half of each scale with FA's Holly Leaf.
- Add a highlight line around the top of each scale with a mix of FA's Holly Leaf and Tapioca, 1:1.
- (The following 3 steps mimic the jewelry section and can be done at the same time).
- (If you have done the shields' scales, this part can be applied to their details too.)
- Basecoat the jewelry with FA's Pure Black.
- All metallic bits were painted with FA's Metallic Pure Gold, then washed with GW's Brown Ink. Today, I might try FA's Metallic Antique Gold or P3's Brass Balls, but back then I used the Pure Gold and ink wash.
- Teeth on the hand weapon, teeth on the shields, and darts on the blowpipe were picked out with FA's Teddy Bear Tan, then highlighted with FA's Tapioca. Leave some of the Teddy Bear Tan to give the teeth an aged look.
- The mouth and tongue were painted with FA's Alizarin Crimson, similar to GW's Red Gore.
- Highlight the tongue with FA's Skintone.
- Pick out the teeth with FA's Tapioca.
- The eyes were painted with FA's Medium Yellow, then a small dot of black was made in each pupil with a very fine tip sharpie marker. Okay, so it's cheating a little but those things are incredible small!
Saturday, August 22, 2009
Light Jacks in Progress
These are the Light 'Jacks I have in progress.

Sentinel - This guy is a little weird. I went through a phase where, rather than putting down a primer coat, I washed them in black paint. The next level of paint sticks just fine but I can really tell in the picture that black was splotchy on the larger plates. This shows up as a weird tone in the blue on the shoulder plates. Not sure what I am going to do on him and I am open to suggestions. Strip him down and start over? Go with it and let him be a little off? What do you think?

Hunter - hmm, looks like I need to prime the axe again...
Sentinel - This guy is a little weird. I went through a phase where, rather than putting down a primer coat, I washed them in black paint. The next level of paint sticks just fine but I can really tell in the picture that black was splotchy on the larger plates. This shows up as a weird tone in the blue on the shoulder plates. Not sure what I am going to do on him and I am open to suggestions. Strip him down and start over? Go with it and let him be a little off? What do you think?
Hunter - hmm, looks like I need to prime the axe again...
Friday, August 21, 2009
Cygnar Heavy Jacks in Progress
Here are the heavy 'jacks that are in progress.

2 Centurions - I am fairly proud of these guys because they were the first 'jacks I built myself and the very first things I ever pinned. They may have also been the first ones where I used cork on the bases. I would really like to get these guys finished up!
Hammersmith - This guy is just huge!
Defender
Thursday, August 20, 2009
The Job & More Cygnar Mini's
Job - For those of you who are following, I just wanted to announce that I was hired today! Yes, I am proud to be a Best Buy employee. Now the trick will be not spending my whole pay check there...
Tharn - are on schedule to be finished by the 30th. I feel good about the details and now have to finish painting the bases before I take the plunge and seal them.
More eye candy - A couple more models I already have painted.
Journeyman Warcaster & Gun Mage Captain Adept
Journeyman Warcaster & Gun Mage Captain Adept
2 Chargers
Wednesday, August 19, 2009
More Cygnar Pics - Units
These are a few pics of the Units I have. Again, I am not responsible for the paint jobs (unfortunately).

Stormguard - The one on the right is the officer and 8 more of the guy on the left make the complete unit of 10.

Long Gunners - I have 14 painted like this, though only 10 fit in a unit. I could pick up 6 more models and take a second unit as you are allowed 2 of these units in an army. I could also add an officer and standard bearer, though I have not bought these models.

Sword Knights - I have 6 of these painted and I could add 4 more troops and an officer and standard bearer.
Field Mechaniks - This is the unit I have. I have 1 more Bodger unpainted and there is room in the unit for 2 more after that.
Stormguard - The one on the right is the officer and 8 more of the guy on the left make the complete unit of 10.
Long Gunners - I have 14 painted like this, though only 10 fit in a unit. I could pick up 6 more models and take a second unit as you are allowed 2 of these units in an army. I could also add an officer and standard bearer, though I have not bought these models.
Sword Knights - I have 6 of these painted and I could add 4 more troops and an officer and standard bearer.
Field Mechaniks - This is the unit I have. I have 1 more Bodger unpainted and there is room in the unit for 2 more after that.
Tuesday, August 18, 2009
Cygnar Warcasters
I thought I would post a few more pics of my Cygnar stuff while I am painting my Tharn Ravagers. Remember, these were bought pre-painted from someone getting out of the game for dirt cheep and, honestly, painted a lot better than I could have =)

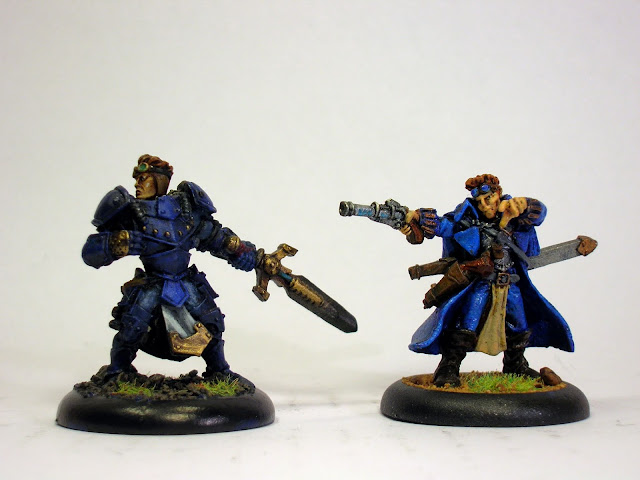
(above: Coleman Stryker - because I bought these from several guys, I ended up with 2 painted Strykers)

(above: Allister Caine)

(above: Reinholdt - He is a mercenary and a great cheap attachment I often stick with Stryker) More tomorrow!
(above: Darius & his Half Jacks - Darius is the largest of the Cygnar Warcasters and looks more like a 'jack. He is slow but has great armor)
(above: Coleman Stryker - because I bought these from several guys, I ended up with 2 painted Strykers)
(above: Allister Caine)
(above: Reinholdt - He is a mercenary and a great cheap attachment I often stick with Stryker) More tomorrow!
Monday, August 17, 2009
iBodger App
I just wanted to throw this in. For those that have a device that can use apps from the Apple Store, namely iPod Touch and iPhones, this is for you. I downloaded the free app iBodger and love it. It is a comprehensive army builder for Warmachine and Hordes. It continues to be updated and is advertised on Privateer Press. Did I mention it is free? It has also been improved since it was first released so you may want to take another look at it. Things I like?
- Space for the creation of multiple armies
- A tab for your whole collection
- A search function
- MKI and MKII rule compatible, just change it in the settings
- Army selection includes special armies like "Cygnar - Storm Knights of the 16th" and the various mercenary charters.
- As you add units and you get close to the point level chosen, it removes units from menu that would push you over the limit (though you can push a button to show them again)
- When you select a unit, you can double-tap them and see their VPs, click the link to their Battle College page, or select "Full Unit" to add in any available officer/standard bearer attachments
My Painting Chart System
Last time, I added a painting chart (here), similar to Admiral Drax's. Let me add a few words about my "system".

(above Thunderhead)
(above: Ironclad)
(above: Hunter & Lancer)
- The ones that are full blue are completed.
- The ones that are gray are primed.
- 4 of the Heavy jacks and 2 of the light jacks are some mid-point in the painting process. As I paint more on my warjacks, I plan to fill in more of the boxes with blue.
- Under the Units heading, I have 4 extra Long Gunners that don't fit in a unit.
- I also have space in the units for 4 more Sword Knights and a Bodger, but I don't have the models.
(above Thunderhead)
(above: Ironclad)
(above: Hunter & Lancer)
Sunday, August 16, 2009
Painting Chart
Recently, Admiral Drax posted his painting chart and it looked great. Check it out here. I liked it so much, I did my own version for my Cygnar stuff. I will eventually post pictures of my army but for now, check this out (click on it for a bigger image).

Like Drax's, this was done in Excel and then converted to a JPEG. I considered adding the points values but decided simplicity was better. Hopefully, with my painting goals, a few more of these models will be completely blue soon.

Like Drax's, this was done in Excel and then converted to a JPEG. I considered adding the points values but decided simplicity was better. Hopefully, with my painting goals, a few more of these models will be completely blue soon.
Saturday, August 15, 2009
Job Interview
I was called back for a second interview and I am pretty excited. I really hope I get the job!
Friday, August 14, 2009
Painting Deadlines
Recently , several paint challenges have been posted, both the Tale of Painters and A Tale of Even More Painters. They both offer incentives to paint a full army in one year. The Rules for the first one go something like this :
The larger numbers are for 40k, Lord of the Ring, and Fantasy armies. The smaller numbers are for Warmachine and Hordes.
I have to say, I am intrigued by the idea of painting 100 pts of Warmachine/Hordes in a month. Then again, it has taken me 3 months to almost finish my Tharn Ravagers. So here are my own deadlines (lets see how long they last!)
I automated reminder blog posts on the the above dates, reminding me of my goals. I can already feel the clock counting down...
, several paint challenges have been posted, both the Tale of Painters and A Tale of Even More Painters. They both offer incentives to paint a full army in one year. The Rules for the first one go something like this :- LEGAL 2000 (1000) point armies
- 200 (100) points per month
- First deadline: September 14th, 2009
- Last deadline: August 14, 2010
- 2 Jokers to use in the 12 month period
- The deadline for entries is the 14th of each month at 11:59 PM MST (GMT-6).
The larger numbers are for 40k, Lord of the Ring, and Fantasy armies. The smaller numbers are for Warmachine and Hordes.
I have to say, I am intrigued by the idea of painting 100 pts of Warmachine/Hordes in a month. Then again, it has taken me 3 months to almost finish my Tharn Ravagers. So here are my own deadlines (lets see how long they last!)
- August 30th - Finish the Tharn Ravagers (yes, based and sealed) (139 pts) [Finished!!!]
- September 30th - 2 Cygnar Centurions, currently based and started outlining (226 pts) [Continued and added the Hammersmith]
- October 31th - Defender, Hunter, and Sentinel, these are also based and if I do them assembly line with the Centurions, I will give myself until October 30th for the lot. (282 pts) [Finished!!!]
- November 30th - 6 Gun Mages and 1 Gun Mage Solo - these are harder for me because in my head there are more models. (122 pts)
- December 30th - 6 Storm Blades + the Officer and Standard Bearer. (127 pts)
I automated reminder blog posts on the the above dates, reminding me of my goals. I can already feel the clock counting down...
A New Computer - Sort of

Just a short note: I have a MacBook and love it. I doubt I will ever go back to a PC unless forced to by work or something. This mac was carried me through 3+ years of grad school and have been stuffed in a backpack a number of times. The case recently cracked on it (very minor) but it is still under warranty so I took it in. The guys at the Genius bar were great and they decided the work would get done quicker if they sent it to the shop, rather than doing it in-house.
 "Main Logic Board, Camera, Heatsink, and Top Case". I have a new computer! Thankfully, I backed up all my files before I took it in, though not the whole system. The upside, I have a brand new computer with 1 month of warranty left. The downside? I have to reinstall everything and find all the settings I had customized. I had to reinstall the operating system (insert 2 discs and wait) and then let it find all the updates (wait another 3 hours).
I also have a job interview today and I hope I get the job!
Saturday, August 8, 2009
Tharn Ravager Details
I started working on my Tharn again. Their last post is here. When I can't quite figure out the next color, they often get left alone for a while. I recently read on GWpertinent's site that this is why you should have several units going at once. That way, if you get stuck on one unit, you can paint another one for a while. I like his advice (and his site!) and I'm considering which other unit to start again.
Several notes:


- Sorry these aren't the best pics but thankfully I was focused on the painting rather than the photography.
- Just a reminder, I use the Folk Arts (FA) paints on my models unless otherwise noted.
- I did a wash of Burnt Umber over the bracers, which you couldn't really see once it dried.
- Next, a wash of Honeycomb over the bracers which lightened it but ultimately I wasn't happy with.
- I did like the GW Dark Green Ink (I don't think you can get this anymore) over the axe, letting it run into the runes.
- I dry brushed FA's Metallic Gunmetal Gray over the green on the axes. It darkened and mostly covered the green, leaving a slight green hue and the runes. I really like FA's metallic line and recommend y'all check them out. They have a high density of metallic particles and come in a variety of colors.
- Then, I edged the "sharp" part of the blade with FA's Metallic Silver Sterling. I am really pleased with this effect.
- The hair looks crazy here and even crazier in person. I used FA's Alizarin Crimson, one of their Artist Pigment line. The artist pigment line has a higher concentration of pigment in the paint. It has to be thinned some but offers great coverage. Normally, this color looks like deep brick red but somehow on him it looked punk!
- Thankfully, drybrushing FA's Pure Orange brought the hair back where I wanted it!
- Here, I have lined the bracers with a thin coat of Honeycomb. I also lined the straps and axe bindings and painted the head coverings (not shown on this model) with the thined Honeycomb.
- I did a light wash of GW's Chestnut Ink on the bracers and I think I can finally live with them.
Friday, August 7, 2009
Hiking
Last year, I got really interested in hiking. I am from Texas and it is so hot there, you really have to be committed to hiking. However, I am in Kentucky now for school and hiking seems a lot more fun.
I am also what you might call a gear-head. All the gear out there seems so cool! What is the lightest, largest tent I might use? What kind of sleeping bag do I need, or do I need one at all? Well, I finally took the plunge and bought hiking boots. My one experience with hiking before involved hiking on a gravel (read sharp rocks) trail in tennis shoes. My friend and I couldn't walk the next day due to bruises on the bones in our feet! Never again!
These are the Vasque Breeze Women's Hiking Boots!
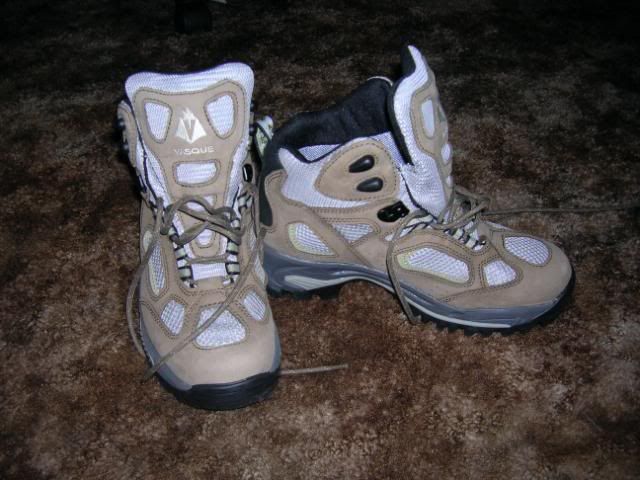
They were a little pricey but the soles are thick and the salesman said they were waterproof (more later). They have great ankle support and the insides are comfy.
A friend took me out to Raven Run, a hiking trail on the Kentucky River. It didn't rain on us but it has been raining the last few days and my new shoes got baptized. There was rain water running in some of the trails that was up to my ankles! Remember how the salesman said they were waterproof? They really are! These things were submerged and my feet didn't get wet.
Also, with the mesh parts, it still felt like my feet could breath. How did they do that???
We saw a lot of amazing things on the trail, including the very high Kentucky River. I felt like a newb so I didn't take out my camera, save for one time. I have never seen, nor did I know fungus could grow this color (and it was even more vibrant in person).

Thursday, August 6, 2009
GW Pertinent
GW Pertinent is hosting a contest/giveaway for the oldest GW painted fig you have. Be sure to read the rules but here is mine. It is not as old as some of the others I have but I went through a phase of stripping old paint jobs off the marines. I left this one because my little brother painted it for me. Not bad for a 6th grader. It seems that they still produce this model but the dust on the base and I guarantee it was painted in the late 80's or early 90's. =)

Not a Mini!
Well, it's not miniature and I didn't paint it... but I built it and I am proud of it so here ya go:

This is the Char-Griller Super Pro. It retails for $139 but the sale price was $79 at our local Kroger Supermarket. Somehow the sale price makes things taste better. It took two hours and both the English and the Spanish instructions but I got it together! (Note to self: On future projects, don't allow the stickers placed on the grill for advertisement to become adhered to the English instructions. Your Spanish is even worse than you remember!) It's about 3x larger than the other one we have and it is charcoal, rather than propane. We will keep the smaller propane grill for days when we just want a burger. This grill will get fired up most weekends. Sunday nights, we have anywhere from 5-15 people come over and I am looking forward to having more grill space. Now I need to go buy charcoal, lighter fluid, a charcoal starter chimney... its like starting a new army!
This is the Char-Griller Super Pro. It retails for $139 but the sale price was $79 at our local Kroger Supermarket. Somehow the sale price makes things taste better. It took two hours and both the English and the Spanish instructions but I got it together! (Note to self: On future projects, don't allow the stickers placed on the grill for advertisement to become adhered to the English instructions. Your Spanish is even worse than you remember!) It's about 3x larger than the other one we have and it is charcoal, rather than propane. We will keep the smaller propane grill for days when we just want a burger. This grill will get fired up most weekends. Sunday nights, we have anywhere from 5-15 people come over and I am looking forward to having more grill space. Now I need to go buy charcoal, lighter fluid, a charcoal starter chimney... its like starting a new army!
Wednesday, August 5, 2009
Werewolf kick
I am still on my werewolf kick. I am looking for fun sites tied to Werewolf: the Forsaken and I came across a fun java module for the phase of the moon. It is now in the right hand column, towards the bottom. It probably won't last there for long but it makes me smile for now =)
Saturday, August 1, 2009
A New (old) RPG


Over the summer, I visited Texas and stayed with my parents. The normal question eventually came up, "Mom, what do you have to read?" My mom has always read a large selection of fiction and introduced me to Sci-Fi and Fantasy at an early age. Journey to the Center of the Earth and Treasure Island were read sometime in the 5th grade, The Hobbit in the 6th. Eventually I had access to a number of great series (the Honor Harrington books by David Weber and the Vorkosigan series by Lois McMaster Bujold are some of the ones that stand out).

This summer, my mom handed me Moon Called by Patricia Briggs. The main character is named Mercy, a modern-day mechanic who can shift into a coyote and lives near the Alpha of the local werewolf pack. She is friends with a vampire and her old boss is fae. The Fae came out of the closet roughly 20 years ago and the fallout is still going on with Fae hate-crimes and voluntary reservations being established. The first book sets out a great modern world with things just hidden in the shadows. I found myself looking for the next book to explore more of her world. I appreciated the strong plots, well developed characters, and no sex scenes (though the tension is there). I read the three out in paper-back in 3 days. I highly recommend the series!
I love the idea of these things being in the same modern world with us and we are simply unaware. Of course, I started thinking about how to use the DnD mechanics to bring this to my game group, but it would take a ton of work.
Then I came across White Wolf and the World of Darkness while voting for the Ennie Awards. Where have I been??? I remember looking at Vampire: The Masquerade (now replaced by Vampire: The Requiem) but it was too dark for us at the time (we were about 14-15). I guess I just stayed away from them since that first impression. Now, White Wolf has an extensive range of books set in the Word of Darkness. I have been reading everything of thiers I can get my hands on for the last 3 days. At first, I started reading the newest WoD core book: Monte Cook's World of Darkness. It uses the v.3.5 d20 system and I instantly have a basic understanding of the mechanics. However, I am not sure I like the story part.

Then I found a copy of the older the World of Darkness, the one the current Werewolf resources are written for. I am still trying to grasp the game mechanics but I like the story more. Of course, I also found the books for Werewolf: The Fosaken. Though the world is different from the one Patricia Briggs wrote about in Moon Called, I like the modern werewolf idea. I should also mention that World of Darkness now hosts materials for Vampires, Mages,
 Changlings, Hunters, and several others. They also produce products for Live Action Role-Playing or LARPing, though this is definitely not my thing.
Now, if I can just convince my group of previous Dnd players that what they really want to be is werewolves...
Subscribe to:
Posts (Atom)
