Instagram Feed

Saturday, September 24, 2011

Progress

To the right of my blog, I have these great little progress bars.  I love changing something from 80% to 90%.  One of these days, several of these will tip over to the 100% mark.  The ones at 93% are waiting for a not so humid day to get their final matte coat and some tufts of static grass.  Oh well. 

This week, I was able to
  • Clear Coat 3 gobber mechaniks, 
  • Clear Coat 10 long gunners
  • Clear Coat 2 LG officers and 2 LG Standard bearers
  • Clear Coat DnD tiefling
  • Base and Prime 6 Trenchers
  • Base and Prime 3 Trencher grenade porters
  • Base and Prime Trencher Officer and Sniper
  • Base and Prime Firefly light 'jack
  • Base and Prime 2 Stormsmith Storm Towers
  • Base and Prime 2 Journeyman Warcasters
Okay, so it was mostly spray painting.  I know I painted a few layers on other things but nothing to really show.  On the painting table for this week is a mass of Trenchers.

The mass needing paint include 1 leader, 9 grunts, 3 grenade porters, the officer and snipers.  15 minis... we will see where this goes.

Tuesday, September 20, 2011

I Got New Minis!

 Recently, there was extra money in the family budget and I got to buy new minis!  I decided I wanted to buy the figs that would complete my trencher unit so I could paint them all in one go.  That means the Officer and Sniper along with three grenade porters.  It also means that a full kitted trencher unit has 15 minis.  That is a ton in Warmachine where often a unit is made of 6.
This is a shot of the other 10 trenchers ready for their buddies to join them in the painting cue.  You might also be able to pick out Eiryss, a unit of rangers, several casters, solos, and a random war wolf.

I also got to pick up 2 of the Stormsmith Storm Towers.  I really like the poses of these models.  I think they are great.  The only down side is that having two of them side by side shows how very similar they are.  I don't like repositioning arms and such but I might with these so they are a little varied.
This is the group based, following the steps I mentioned here.  It is tough not to get so excited you get the steps out of order!
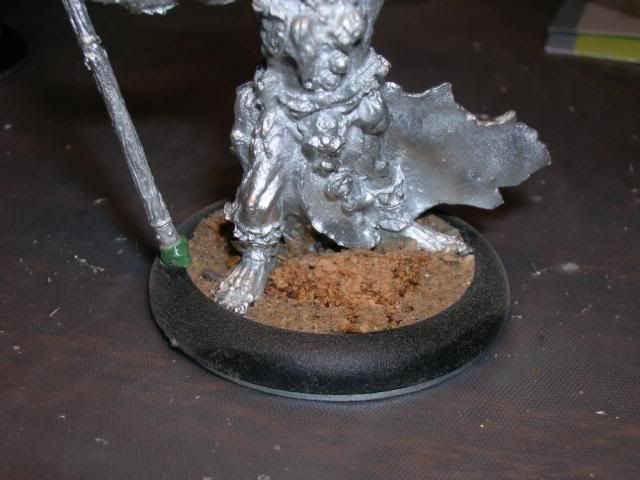
On the Storm Towers, I used the cork for the interesting scenery bits.  Because of the cork and the space on the larger base, I glued the cork down first, then glued down the sand.  It just seems to blend the cork in better.
I did something a little different this time when I went back over the sand with my mix of glue/black paint/water.  I mixed it right in the glue bottle!  It was a little messy, as you can see from the top of the glue bottle, but overall, I liked the experience.  I did still have to spread it with a brush, as I perhaps didn't have enough room for water but it was fun.
I got the idea from scrolling through Mik's Minis, looking at his basing.  Three pics down is a picture of a plastic syringe he uses for the second layer of glue.  Check it out here

As you can see, the second coat doesn't have to cover like a base coat.  I just use it to make sure the sand is locked down and to get black into the crevices.  This will save me time when I am touching up after I spray the base coat.

Monday, September 19, 2011

Basing

There are a lot of great instructions out there for basing your minis.  Just a few links to get you going:

One of my flying bases
Santa Cruz

Just the Bases

Hand Cannon Online Part 1 and Part 2

Recently, I started painting again and it had been a while.  Okay, it had been about a year and a half.  It had been so long, that I got all of my basing steps out of order and it caused me extra work.  So I am writing myself a blog for the steps I like to follow.  Read along if you like =)

Step 1: Don't get too excited!  I know you just got that new ______ but follow the steps!  It will save you headaches later.

Step 2: Wash the mini in soap, water, and toothbrush.  I have never actually done this step but I want to start.  The last models came with a lot of mold release still on them.
Product Link

Step 3: Clean the mold lines, flashing, and vents.

Step 4: Crimp the slots to hold tight in the slota-bases.  Shave down the words on the slots if needed.

Step 5: Super Glue the mini into the slot and let it dry.  I really like the Loctite Superglue Gel.  It stays where I want it and has a tight, fast bond.

*If the base is large or the extra basing detail is large, reverse steps 6 & 7.  Note the Tharn Ravager below.  It actually worked better to glue the cork first but it was a pain painting the white glue around more pieces.

Step 6: Paint white glue onto the base.  Add a drop or two of water to get it to flow around the feet.  Dip the base with glue into the fine sand and knock off the extra.  While it is still moist, use your thumb to clean up the ring of the base.
Small Slate Chips from Santa Cruz

Step 7: Again, while it is still moist, move some of the sand out of the way and place a drop of Superglue Gel onto the base.  Place several small stones/cork/slate onto the base.  I do this step after the white glue because it makes it easier to paint the white glue on.

Step 8: Once dry, paint the base with a mix of [5 parts white glue / 5 parts black paint / 2-3 parts water].  The idea is to lock the sand down and let the black pigment sink into the crevices.  The black doesn't have to cover because in a moment we will spray paint it.  But first...

Step 9: Glue the metal washer onto the base.  I use Gorillla Glue for this application, as explained in another post.  If needed, shave down the extra metal from the slot with a Dremal sander so it doesn't 'rock' when on the washer.  I like adding the metal washer because I feel like it adds a little weight to the miniature and makes it less top heavy.  Do this after dipping it in the sand.  Otherwise, trapped sand will continually sneak out.  *Note: If you are going to magnetize the base to something like a movement try, the washer is out.
Cork with Sand
Step 10: Spray paint with flat black paint.  I prefer Krylon because it is the flattest I have found and it has good coverage.  It is best to have disposable gloves on (especially if you have to go to work later) but I have used a plastic bag as a glove before too.  Light layers and don't get it too thick.  Also, turn your spray can upside down at the end and spray until the gas comes out clear to clean the nozzle.

Step 11: Dry brush the base (and anything on the mini that needs dry brushing) first so your feet don't get dusty later.

Step 12: Don't get in a rush.  Wait to glue the static grass on after the clear coat.  Otherwise, static grass will find it's way into every nook and cranny of the mini.

This is my current process, broken down into the gory details.  What do you like?  What do you do differently?

Saturday, September 17, 2011

Sims: Be Warned


I have liked the Sims games for a long, long time.  It started off with a love affair for Sim City.  I was head over heals for Sim City 2000.  I toyed around with Sim Theme Park, though I quickly strayed to Roller Coaster Tycoon.  The Sims were where I lost all control.  I began playing Sims 2 one afternoon and three days later, I got up to stretch my legs!  (this is only a slight exaggeration).  Thankfully, my computer was too old and couldn't play Sims 3.  Today, I found Sims on Facebook.  It doesn't matter how old your computer is.  They will take you anyway they can get you.  And they got me good.  I lost 5 hours today!  Be warned.  It is a great little game, much better than the farming and mafia stuff.  And now I'm late for work...

Friday, September 16, 2011

Shopping and Girl Fights

Post Game for DnD Night:

The Food: Hearty Queso
Ingredients-
  • 1 Can Black Beans
  • 1 Can Corn
  • 1 pound ground beef
  • 1 jar of queso
  • 1 bag of corn tortilla chips
Directions:
  • Cook the ground beef and season with salt, pepper, garlic, and onion.  Think taco meat.
  • Drain the black beans and corn.
  • Drain the meat when it is cooked through.
  • Pour the beans and corn in the same pan as the beef and mix on a medium temp.
  • Turn the temp to low and add the queso.  Stir.  If you let it sit, the cheese will burn to the bottom of the pan.
  • Serve with corn chips.
  • This also works well in a slow cooker at parties!

Thursday night is our DnD 4E game.  We have been playing for a couple of months now and the newbies are hacking their way through hobgoblins and undead like pros.  Well, at least like competent amateurs.  Last week, they ran head long into a patrol of hobgoblins that were able to roll 18-20's on most of their attack rolls.  The fighter, was knocked into his second death saving throw (3 strikes and your out).  This week, the fighter and the cleric were both absent, leaving the party with just the female players.

Girls Night!!!

They decided to leave the dungeon, sell some loot, and buy healing potions and some AoE alchemist fire.  Girls after my own heart.  When they made it back to Winterhaven, they found that the dead in the graveyard had risen and the town needed them to fight off their dead relatives.  Once in the graveyard, they ran into the female elf who had given them bad information and nearly caused their demise.

The alchemist fire bombs quickly dispatched the decrepit skeletons while concentrated attacks took out the Elven B****.  They found a note on her, giving them more reason than ever to return to the keep and stop the evil plans at work.  They also learned the name of the one trying to open the portal: Kalarel.

Monday, September 12, 2011

Sick Time = Painting Time

I stayed home from work today with a head cold.  I have been able to paint some and this is what I got done.  These three bodgers will round out my Field Mechaniks unit.  I love these little models.  They are some of my favorites in the Cygnar line.  The only complaint is that there are only two poses. Oh well.


Saturday, September 10, 2011

The Cygnar Army as it Stands

The blue stuff is done. The grey stuff is assembled and primed. The clear stuff has a long way to go.  For those new to WarmaHordes, US is the unit strength or the number of minis in a unit.  FA is the number of those units you can have on the field.  US 6-10, FA 2 would mean you could have a maximum of 20 of those models on the field in a single warcaster army.

Thursday, September 8, 2011

New Site to Check Out

I was searching for something or other and I stumbled across a new blog.  At Just the Bases: Custom Basing Ideas for Wargaming Minis, "Our goal is to become a repository of basing ideas for you to access as you put the finishing touches on(or are building) your miniature."  Check them out at http://justthebases.blogspot.com.  The bases are fantastic.  Here is an example:


Photobucket sucks...


From the blog site Just The Bases.  Picture at http://i127.photobucket.com/albums/p150/arithorn/1athundernemo.jpg. I think their bases & their painting looks fantastic!!!

Wednesday, September 7, 2011

Lots of Base-ing

Currently, I am basing.  I am gluing down sand, painting it with a mix of black paint and Elmer's glue, and drybrushing it with dark brown, light brown, and gray on the rocks. There are no pics because they just look black right now, but I am still painting and that is a good thing.  The batch?

  • 3 Bodgers
  • 10 Trenchers
  • 6 Rangers
  • eStryker
  • eCaine
  • eHaley
  • pNemo
  • pHaley
  • Kara Sloan
  • Squire 'Jack
  • Firefly
  •  
  • Piper of Ord
  • Eiryss, Mage Hunter
  •  
  • 6 Circle Druids
  • 1 Circle War Wolf
  •  
  • 1 DnD Character
More to come soon.

    Tuesday, September 6, 2011

    I Wants It....

    So I work at the American electronics store Best Buy.  There are a few perks.  One of them is putting your name on the cardboard shippers that come out.  Mine is all over the back of the Space Marine game shipper.  I also tried for the Star Wars in the background but that was labeled way before I could get my hands on it.  Oh well... soon the Space marine will be on my wall =)


    While I was at work today doing... product research (yeah, that's what we will call it), I came across a game that releases 10/25/11.  It is called Disney Universe.

    It looks like a fun cross between Little Big Planet, Disney's Extreme Skate Adventure, with a smidge of Kingdom Hearts. It is being carried on PS3, Xbox and Wii.  The screen shots looks like the scenery might not get 5 stars but I like the idea of collecting the suits and cooperative game play of 1-4 players.  Also, if you pre-order the game through Best Buy, you get the download codes for Peter Pan, Daisy Duck, and Absalom. It also looks like Game Stop is giving you the download code for Captain Hook, Daisy Duck, and Absalom.  (Neither store is supporting the downloads on the Wii.)  At $49.99 USD, this is definitely going on my wish list!

    Saturday, September 3, 2011

    Dnd Night


    I look forward to DnD night all week. I get to have my friends over, we eat great food, and we roll some dice.

    The group I am DMing for consists of 4 newbies and 1 with a year of experience.  I really like teaching the game to new people.  The always seem to come up with new ideas I don't expect.

    This week, one of the guys made Asian BBQ Chicken, Grilled Corn on the Cob, and a wonderful Ice Cream Topping with Peaches, pecans, brown sugar and butter simmered on the stove.  It was fantastic!!!

    The picture to the right is the first level of the Keep on the Shadowfell, a great adventure to take your PC's from 1-3 levels.  The maps are well made and the story is fairly straight forward.  The PC's have gone through the preliminary story and now they must fight their way down to the second level and seal the rift before Orcus is able to come through.

    They have acquired 2 pet goblins and lots of experience.  I love Thursday Game Nights =)

    Friday, September 2, 2011

    Gorilla Glue

    I like gluing washers to the bases of my mini's.  It makes them just a little weightier and a little less likely to tip over.  The best stuff I have found for this is Gorilla Glue.  When it dries, it forms a tough bond.  The best part is that the glue is somewhat rubbery.  This means that dropped minis don't lose their bases.  This stuff can take a bounce.  I have been using the standard stuff that dries a light brownish yellow.  I just bought the stuff that dries white and I will let you know how that turns out.

    Two things about Gorilla Glue.
    1.  It works best when under pressure.  What that means is you have to be able to clamp it and leave it.

    2. It foams as it activates and dries.  This produces a good bond, even on uneven surfaces but it leaves some strange results.  It is easy to trim off of a base or file down.  I have had problems using it in tight detail places as you can't quiet get your files and knives down into them to clear out the small stuff.

    I don't recommend it on arms other places where it might foam onto your details but for big flat surfaces, it is the toughest stuff I have found.


    Thursday, September 1, 2011

    The Tiefling

    She makes her debut tonight on our DnD table.  She had a couple of weapon swaps, a good bit of purple ink from the old GW series, and a couple of cleavage lines.  All she needs is her base finished and a clear coat.  Not bad for having not painted anything in a year.


    Label Cloud

    Mini's Past